Running on Windows
On Windows, we will concentrate on the “Windows Subsystem for Linux” (i.e., the WSL) as a development environment. This provides us access with a Unix-like environment where we may launch processes, develop applications, and synchronize our code with git.
Windows 10 vs. Windows 11
These notes are written with Windows 11 as the target operating system. Windows 10 should mostly work the same, but may not have the Windows Store, PowerShell, or the Windows Terminal by default. We recommend against using older Windows operating systems (e.g. Windows 7, 8) as they have limited support and are unlikely to receive updates.
This guide presents five steps to get a full Python development environment running on Windows:
- Install the Windows Terminal
- Install the WSL
- Install
python3.10-venv - Install Visual Studio Code
- Install the WSL VS Code Extension
Install the Windows Terminal
📝 Primary Documentation: https://learn.microsoft.com/en-us/windows/terminal/install
Note: Recent versions of Windows 11 may ship with the Windows Terminal already installed. Check first by pressing the Windows key ⊞ Win and typing “Terminal,” or clicking the “Start” menu button in the taskbar and typing “Terminal.”
Install the WSL
📝 Primary Documentation: https://learn.microsoft.com/en-us/windows/wsl/install
Tutorial: Set up a WSL development environment: https://learn.microsoft.com/en-us/windows/wsl/setup/environment
The WSL is the Windows Subsystem for Linux.
(1) Install Step
Open PowerShell and type the install command:
wsl --install
- This will probably take a few minutes.
- When installation completes: restart your computer.
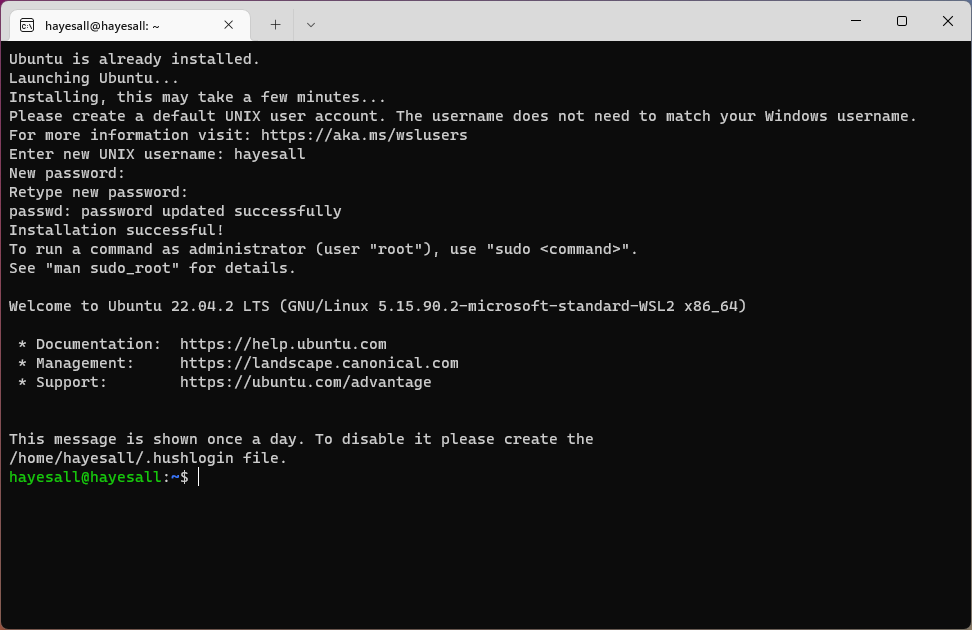
(2) Setup
You will need to set a “UNIX username” and “password.”
- We recommend using your IU username as the username. For example: Alexander uses “hayesall”
- Typing in the password field will not show anything because the text is hidden (you do not want someone to look over your shoulder and easily see your password).
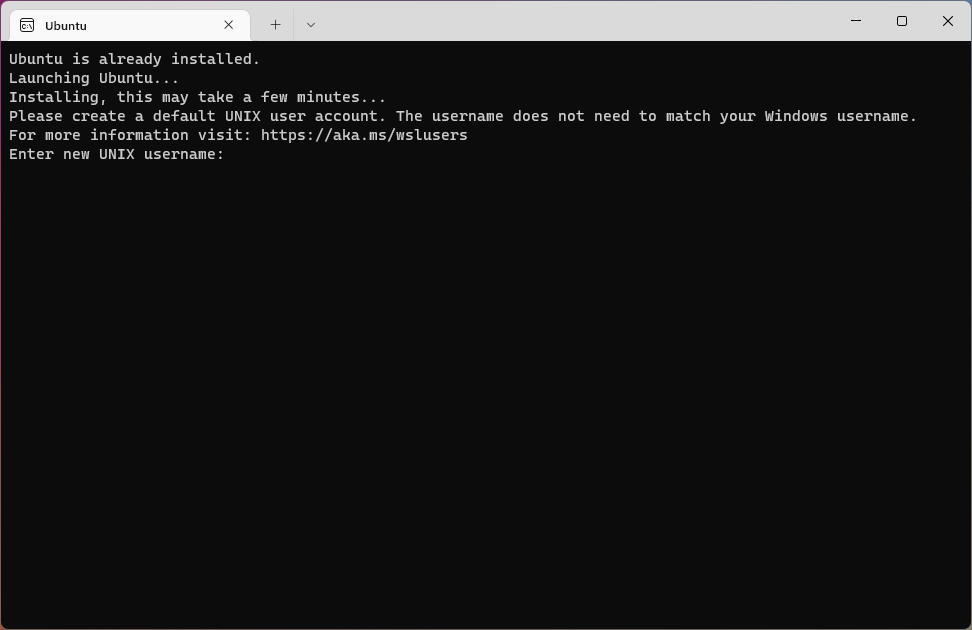
Notice that the area to the right of “New password” and “Retype new password” is empty in the following image. UNIX-like systems handle password fields by not displaying anything: you can type characters but they are are not shown. If you get lost: hold down the Backspace key for a few seconds to clear out anything typed previously.
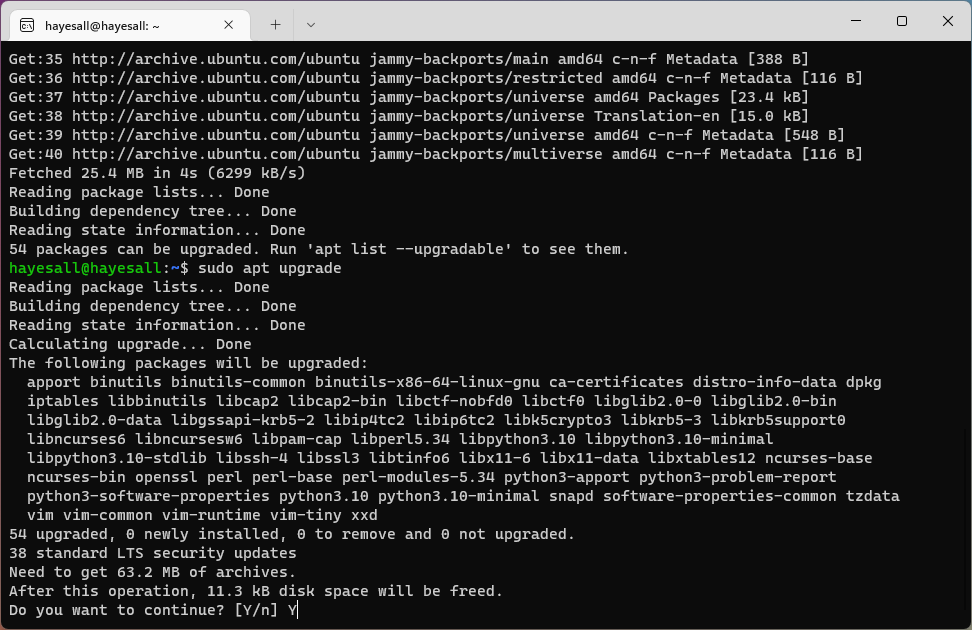
(3) Update, Upgrade, and Install Linux Tools
Similar to the way that Windows has its own set of updates, we need to make sure that our Linux subsystem is up-to-date. Ubuntu has a package manager called apt that helps us here.
Any time we install or upgrade packages, apt will print a message summarizing the changes that are about to take place, and the prompt us for whether we are okay with these:
Do you want to continue? [Y/n]
Briefly skimming the message, typing Y, and pressing Enter is usually going to fine for the workflows we describe in the remainder of the book.
sudo apt update
sudo apt upgrade
We can use this to install any set of packages. git and python3 should be available by default, but we also need venv to manage Python virtual environments:
sudo apt install python3.10-venv
Install Visual Studio Code
📝 Primary Documentation: https://code.visualstudio.com/docs/setup/windows
Follow the VS Code Windows recommendations, and install the WSL extension.
- Download a
.exefrom https://code.visualstudio.com/ - Run the installer
- Open VS Code. A start menu link should be added, allowing you to open the start menu with the Windows key ⊞ Win and type Visual Studio Code.
Install VS Code Extensions
The Extensions Panel is one of the options at the left of VS Code, or can be opened with the Ctrl + Shift + X keyboard shortcut.
The Python Extension and WSL Extension will help us get started. Search and install each by typing the name of the extension in the search bar.
| Python Extension | WSL Extension |
|---|---|
 |  |
Final Check
Open Windows Terminal, then Ubuntu, and check that git, python3, and code are available:
$ git --version
git version 2.34.1

$ python3 --version
Python 3.10.6

$ code --version
1.79.2
Troubleshooting
Example of git missing defaultBranch configuration
$ git init
hint: Using 'master' as the name for the initial branch. This default branch name
hint: is subject to change. To configure the initial branch name to use in all
hint: of your new repositories, which will suppress this warning, call:
hint:
hint:   git config --global init.defaultBranch <name>
hint:
hint: Names commonly chosen instead of 'master' are 'main', 'trunk' and
hint: 'development'. The just-created branch can be renamed via this command:
hint:
hint:   git branch -m <name>
Initialized empty Git repository in /home/hayesall/demo-dir/.git/
Example of the failing venv command
$ python3 -m venv venv
The virtual environment was not created successfully because ensurepip is not
available.  On Debian/Ubuntu systems, you need to install the python3-venv
package using the following command.

    apt install python3.10-venv

You may need to use sudo with that command.  After installing the python3-venv
package, recreate your virtual environment.

Failing command: ['/home/hayesall/demo-dir/venv/bin/python3', '-Im', 'ensurepip', '--upgrade', '--default-pip']
WSL fails to install with WslRegisterDistribution
If a message indicates that the WSL failed to install, for example with a WslRegisterDistribution error similar to the following:
Installing, this may take a few minutes...
WslRegisterDistribution failed with error: 0x80004002
Error: 0x80004002 No such interface supported

Press any key to continue...
A likely fix is to (1) restart the machine, (2) open Windows Terminal in administrator mode (⊞ Win + type “Terminal” + right-click and select “Run as Administrator”), (3) run the wsl --install command again, (4) restart the machine one final time.
WSL starts as the root user
If you open the WSL and see root, similar to this:
root@username:~#
Then an issue occurred when Ubuntu was installing.
Option 1: ubuntu config
- In Ubuntu, check whether your username is in the
passwdfile:
cat /etc/passwd
- Alexander would look for something like:
your_username:x:1000:1000:,,,:/home/your_username:/usr/bin/bash
- In a PowerShell tab, set the default user like this (replacing
your_username):
ubuntu config --default-user your_username
-
Close the Terminal, re-open Ubuntu, and check if it’s fixed.
-
If it is not fixed, try “Option 2”
Option 2: modify the wsl.conf
In Ubuntu, open /etc/wsl.conf with a text editor like nano:
nano /etc/wsl.conf
This configuration should have a [boot] option by default. We will add the Unix username set earlier (replacing the your_username in the following), so the file should look like the following:
[boot]
systemd=true

[user]
default=your_username
Save the changes and exit (e.g.: in nano with Ctrl + O + Enter, then Ctrl + X to exit).
Finally, restart the WSL.
Option 3: re-install Ubuntu
Restart the WSL
Try shutting down the WSL and restarting it.
- Close any Linux (e.g. Ubuntu) tabs in the Terminal
- Open a PowerShell tab
- Run the shutdown command:
wsl --shutdown
exitany Terminal tabs, and close the Terminal- Launch the Terminal again
Upgrade Software
The WSL has its own set of software dependencies that are installed and kept up-to-date separately from the actual Windows operating system.
These commands will ask for your WSL password.
sudo apt update
sudo apt upgrade
Removing and Reinstalling the WSL
Uninstalling then reinstalling an operating system is destructive: it will remove all files, programs, and settings. We will usually recommend this as a last resort if the previous options did not work.
- Close the Windows Terminal, VS Code, and any processes that may have Ubuntu open
- Re-open the Windows Terminal, choosing “PowerShell”
- Uninstall Ubuntu using the
--unregisterflag:
wsl --unregister ubuntu
- Re-install Ubuntu:
wsl --install