Networked Computers, Servers, and HTML
The previous lesson introduced the file system hierarchy to explain how computers are organized, and the essential Linux commands needed to make files or directories, then change them in some way.
Today we have to acknowledge a fact about the world: you are not the only person in it. Any time you visit a website or install a program: you are interacting with other agents.
Those terminals we interacted with were text-input-output interfaces to our computers. Each command either gave us some information, or it changed our computer in some way. But here’s an idea: what if we could use a terminal to control a computer on the other side of the world? Text-input-output worked for our local machine, so what if we could use the same approach to interact with a remote machine as well. This concept is the local-remote divide.
Today we will see two reasons why these are essential:
- most computers do not have a Desktop with clickable buttons: the vast majority of computers are servers that one must interact with by typing commands, or by writing code to instruct the servers how to behave
- almost every website lives on a Linux system: developing a site (or navigating one) builds on file hierarchy foundations
Web development (or webdev) projects share the Linux file system structure. It requires a knowledge of content authoring written using a markup language like HTML (hypertext markup language). It also requires being familiar with how content is presented: using a combination of style adjustments with cascading style sheets (CSS), and client-side scripting with JavaScript (JS).
website-project/
├── about.html
├── contact.html
├── css
│   ├── normalize.css
│   └── styles.css
├── images
│   ├── logo.svg
│   └── me.png
├── index.html
└── js
    └── main.js
But this puts the cart before the horse. First we need to ask: how does the content reach the end user?
A pattern that repeats over-and-over again in computing is the client-server architecture. In a client-server architecture: there are clients that request information, and there are servers which have information and can provide it to a client.
🛜 Networking: How do clients and servers communicate?
What happens when a user opens a web browser, types in a uniform resource locator (URL) like
https://cgi.luddy.indiana.edu, and presses ↵ Enter?The web browser must translate the human-readable address; composed of the communication protocol (
https://), domain name (indiana.edu), and subdomain names (cgi.luddy) into an internet protocol address (IP address, where IPv4 addresses are represented by four 8-bit numbers, like:127.0.0.1) for the server(s) responsible for that resource.The browser does this by first checking its cache of recent IP addresses, or reaching out to successively more authoritative domain name servers that keep track of which IP addresses are associated with each domain (e.g., Google maintains a name server at
8.8.8.8). Once found: the browser opens a connection with the server (e.g.156.56.83.26) to begin negotiating the means of communication and which resources it expect. When the client and server agree on the means of communication, the server will either succeed and return the content, or it will fail and return an error code (e.g.404: Not Found).
Individual web pages get served by a web server to the client’s web browser. This means two computers must be in communication: a personal computer, and a server.
Today we will practice three concepts:
- Secure Shell: ssh - a communication protocol allowing one to securely send commands to a Linux server via a text interface
- HTML: Hypertext Markup Language - a markup language used to write content for end users, rendered with a:
- Web browsers - a program used by an end user. The browser abstracts away networking details, and most details for how websites are actually built
Secure Shell Client: ssh
From the man ssh page: “ssh (SSH client) is a program for logging into a remote machine and for executing commands on a remote machine.”
We hinted that most computers are actually Linux servers, and that some of those Linux servers are connected to the Internet. Some of these servers also happen to be configured such that they are constantly waiting for an incoming SSH request: representing that someone wants to log into the server.
For Luddy students at Indiana University, one of those servers is silo.luddy.indiana.edu. Opening an SSH connection starts with your username, and the domain name of the server, e.g.:
$ ssh USERNAME@silo.luddy.indiana.edu
Since Alexander’s username is “hayesall”, their first login attempt would look like:
$ ssh hayesall@silo.luddy.indiana.edu
The authenticity of host 'silo.luddy.indiana.edu (129.79.247.195)' can't be established.
ED25519 key fingerprint is SHA256:NN9t8i9VNO3zsN05kz835zGdFRzvnj6fSiRbY7xVFjE.
This key is not known by any other names
Are you sure you want to continue connecting (yes/no/[fingerprint])?
After confirming by typing yes + ↵ Enter, the server asks for a password (password characters are invisible, if you make a mistake: clear with ← Backspace and try again):
Warning: Permanently added 'silo.luddy.indiana.edu' (ED25519) to the list of known hosts.
(hayesall@silo.luddy.indiana.edu) Password:
A successful password then invokes a two-factor authentication step. Alexander types 1 + ↵ Enter, and confirms the push on his phone.
(hayesall@silo.luddy.indiana.edu) Duo two-factor login for hayesall

Enter a passcode or select one of the following options:

 1. Duo Push to XXX-XXX-0123

Passcode or option (1-1): 1
Success. Logging you in...
… which successfully gives them access to the server. Now our prompt is different, as silo + SSH are configured to show the server’s hostname:
hayesall@silo:~$
Every command until the end of this chapter should be run on silo. For example:
$ hostname
silo
$ hostname -i
129.79.247.195
Linux on the Server
Everything discussed in the previous chapter is still true, but now everything is done on a shared computer. Instead of each of us having our personal machines (perhaps with 8 CPU cores and 8 GB of memory), we can seamlessly share a powerful server (with 48 CPU cores and 500 GB of memory).
All 4955 people1 with an account have their own private home directories:
$ ls ~/.. | wc -l
4955
Every single personal machine is slightly different, but everything on the server is the same: the same version of Python and the same core utils. If you were previously on macOS (running Apple’s custom version of the ls command), you probably didn’t have all of the ls options available to the people on the WSL/Ubuntu/ChromeOS. But now:
$ ls --version
ls (GNU coreutils) 8.32
… the ls command on the server is the GNU coreutils edition. Everyone has equivalent resources, and everyone has a consistent set of software packages to build off of.
This is an important step in our goal to make software for everyone to use, and not just a program that runs on your computer. 👏
Web Sites and Web Server Foundations
A website is a collection of related web pages (see next section) hosted using a web server to facilitate two-way communication in a client-server architecture. At Luddy, we share a common domain name cgi.luddy.indiana.edu, which distributes sites via shared Linux web servers.
To get started, run the make-cgi script:
make-cgi -y
Make sure you copy this code in exactly.. there is a copy button in the top right corner of the code boxes. It appears on hover.
This creates a cgi-pub directory in the home directory, containing an index.html:
$ tree cgi-pub
cgi-pub
└── index.html
Note: “tree” is a Linux command that isn’t installed by default. We’re using it here to quickly show you a visual representation of the file structure, but you don’t need it for class.
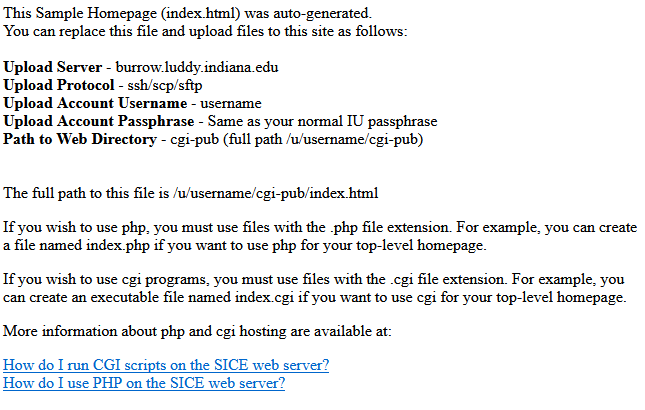
Most web servers use index.html as a default content page. Now when you open a web browser and point it to the address (changing USERNAME to your username):
https://cgi.luddy.indiana.edu/~USERNAME/
… you should see something like:
📦 “Real World” Web Sites and “Real World” Web Servers
Starting a “real world” website involves several more steps: (1) obtain a domain name from a domain name broker service, (2) rent or configure a Linux machine with a web server like Apache or nginx, (3) configure the DNS A or AAAA record to resolve to the server’s IP address, and (4) move content into the server’s content folder (e.g. on Apache:
/var/www/html).It’s a misnomer to draw a line between the “real world” and a “fake world”: you’re building real things in this class, so everything you do is part of the real world. But like many abstractions, we gloss over details: such as how
make-cgiis a Perl script maintained by Rob Henderson (SICE IT) that configures a series of extended access control list (ACL) options in order to make a folder stored in a user’s (private) home directory accessible to anyone with an internet connection.
Web Page Foundations
With our cgi-pub directory configured, we’re ready start writing individual web pages to collectively progress toward coherent web sites.
Web pages are made up of three programming languages:
-
HTML: Hypertext Markup Language - a markup language to represent types of content (headers, sections, paragraphs) and the content itself: informing a web browser what to display
-
CSS: Cascading Style Sheets - a domain specific programming language used to style and layout content in a web page: informing a web browser how to display it
-
JS: JavaScript - a general purpose programming language used to make web pages dynamic by responding to a user’s interactions with the page. This language works best alongside HTML and CSS (front end), but JavaScript is also used on the back end to write applications and interact with databases (e.g. Node.js)
Although these three languages work in conjunction, that dance 🪩 is reserved for other courses.
In this course: we focus on writing content in HTML, and we will rely on a front-end framework called Bootstrap that packages CSS and JavaScript into a pre-built component library. This will give us the tools to build a professional-looking website, while leaving some details (how CSS and JS actually work) as future topics.
We’ll get back to the front end in unit 2. For now, let’s focus on writing content.
HTML and the Document Object Model
Hypertext markup language (HTML) is an example of a markup language with a relatively simple structure for both humans and machines to read.
Each HTML tag represents a type of content. Many of these tags are drawn from terminology developed out of the needs that typically arise while publishing written material:
<article>- a discrete composition<section>- a discrete section in an article or document<h1>- the main header, such as a page title<h2>- the secondary header, like a subsection<p>- a paragraph
When HTML is read into a browser, the browser parses (breaks into distinct pieces) the tags into (surprise!) a tree-like data structure consisting of parents and their children. For example, an individual web page for a news article might be structured to contain a <body>, which in turn contains the actual <article>. The article contains a large header (<h1>) at the top, followed by multiple sections which each contain sub-headings (<h2>) and paragraphs (<p>).
<html>
├── <head>
│   ├── <title>
│   └── <link>
└── <body>
    └── <article>
        ├── <h1>
        ├── <section>
        │   ├── <h2>
        │   └── <p>
        └── <section>
            ├── <h2>
            ├── <p>
            └── <p>
Each HTML tag is responsible for two things: the type of the content, and the content itself. For example, in this listing:
<h1>Title Goes Here</h1>
The content type is a level-1 heading <h1>, and the content itself is Title Goes Here.
Without HTML, we just have text:
HTML

HTML HyperText Markup Language (HTML) is the standard markup language for
documents designed to be displayed in a web browser. It defines the
content and structure of web content. It is often assisted by
technologies such as Cascading Style Sheets and scripting languages such
as JavaScript.

-- Wikipedia
… which is informative, but perhaps not the most readable.
It’s best to aim for “semantic” markup, where we use the full range of HTML tags to give the best meaning possible to content. Well marked-up content has several implications for (1) improved accessibility, such as for users with screen readers, (2) achieving better rankings in search engines, (3) providing re-usable components when styling a page, and (this is the “semantic” part) (4) providing context for the content within.
Writing HTML is incremental: content and structure can be separate, so one may focus on one or the other before reaching a result. We might start with the text content above, and structure it with appropriate tags like this:
<h1>HTML</h1>
<p>
<strong>HyperText Markup Language</strong> (<strong>HTML</strong>)
is the standard markup language for documents designed to be
displayed in a web browser. It defines the content and structure of
web content. It is often assisted by technologies such as Cascading
Style Sheets and scripting languages such as JavaScript.
</p>
<p><a href="https://en.wikipedia.org/wiki/HTML">— Wikipedia</a></p>
HTML Reference
Dividers
The most generic tags are for a box (or “division”) for layout and a paragraph for text.
<!-- an empty box -->
<div></div>
<!-- a paragraph -->
<p>Place text here.</p>
Our main focus will be on marking up our content, meaning text, images, links, lists and tabular data.
Keep in mind that although the browser has a default style sheet (CSS) built in, pages marked up with ONLY HTML are not pretty, however the content should have a clear hierarchy and each piece should seem to have a role within the page.
Text
<!-- headlines go up to <h6> -->
<h1>Title</h1>
<h2>Chapter</h2>
<h3>Subhead</h3>
<!-- any text that is not a headline, is a probably a paragraph -->
<p>Text content</p>
Some tags require attributes to provide additional information, link to CSS, or connect to JavaScript. Attributes are ALWAYS written with no spaces as name="" and are separated by a space within the opening tag only.
<p class="byline">By Erika Lee</p>
   ^-- attribute to connect to some CSS for specific styling
It’s possible to have more than one attribute on a tag. It’s also possible to have more than one class on a tag. Classes are how we connect our content to styling declarations within the CSS.
<p class="lead centered" id="introduction">Multiple classes</p>
If multiple classes are present, just separate the class names by a space (as done here with lead and centered). Same with multiple attributes (class and id). Separate by a space, but no spaces within the attribute (i.e. between the name, equals sign and double quotation marks).
Images
Images require the alt attribute. Think of it as a short description for the image.
<!-- images require the alt attribute -->
<img src="images/logo.png" alt="logo">
Links
<!-- links can point to a page in your website -->
<a href="about.html">About</a>
<!-- links can point to another site on the web -->
<a href="https://en.wikipedia.org/wiki/HTML">What is HTML?</a>
Lists
Lists come in two varieties: unordered lists (<ul>) and ordered lists (<ol>). In both cases: each item in the list is a list item (<li>):
|
|
|
|
Tables
Tables are for displaying information in a row and column format.
<table>
    <tr>
        <td>Row 1: Column 1</td>
        <td>Row 1: Column 2</td>
    </tr>
    <tr>
        <td>Row 2: Column 1</td>
        <td>Row 2: Column 2</td>
    </tr>
</table>
Nesting: Tables show us that HTML tags can and usually are nested. Think of each HTML tag as a box being drawn on the screen. Websites are really just a set of nested boxes. Notice that tags DO NOT OVERLAP like <h1><p></h1></p>.
TABLE starts and stops the tabular data section. The TR stands for “table row” and the TD stands for “table data” and represents the column.
Follow Along with the Instructor
Practice with the instructor: command line interfaces, basic HTML, Unix/Linux file systems, and remote servers.
Practice
We’ll build a two page site with just enough CSS to make our content look nice:
01 Connect to the Remote Server and Setup CGI
Today we’d like you to access the Silo server, provided by Informatics, using ssh:
Open a terminal, then follow along in “Secure Shell Client: ssh” above using your IU credentials (username and password).
TIP: Remember that the password is hidden as you type (you don’t want people looking over your shoulder and knowing your password). It’s okay if it takes a couple attempts.
02 Setup CGI
Once you’re logged in, run the make-cgi command as shown in “Web Sites and Web Server Foundations” above which will create a cgi-pub directory and allow us to run websites and web applications.
03 Set up a basic website structure
- Navigate to
cgi-pub - Using the command line, set up the following basic structure for a web site project:
first-website/
├── unix.html
├── css
│   └── style.css
└── index.html
04 Add HTML content to the home page
Use nano to add the following code for a blank web page to index.html, then save your work.
<!DOCTYPE html>
<html lang="en">
<head>
    <meta charset="UTF-8">
    <title>First Website</title>
    <link rel="stylesheet" href="style.css">
</head>
<body>

</body>
</html>
Inside the body, add:
- a heading with your name
- a paragraph with a welcome message
- a link to
unix.html - a second-level heading labeled “Favorite HTML Tags”
- a list with some of your faves; skip the
< >greater than / less than signs
When you are done, save your file.
View the result in a browser, replacing USERNAME with your IU username:
https://cgi.luddy.indiana.edu/~USERNAME/first-website/
👀 Notice how the directory structure carries over into the URL
The
cgi.luddy.indiana.edu/~USERNAMEpart connects to thecgi-pubdirectory. Anything inside—like thefirst-websitedirectory—becomes part of the URL. We don’t need to addindex.htmlto the end since it’s the default.
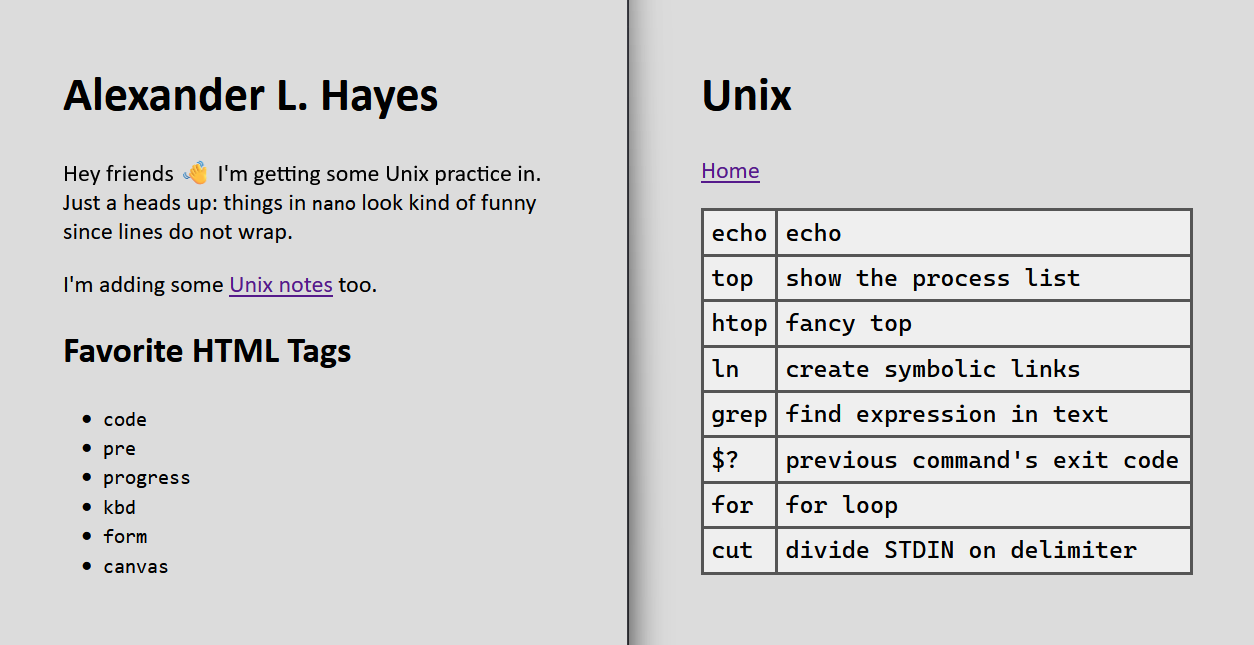
05 Add HTML content to another page
Use nano to add the code for a blank web page to unix.html, then save your work.
In the body, add:
- a headline titled “Unix”
- a link called “Home” that goes back to the home page
- a table: two columns, at least 4 rows (Hint: copy-paste our table example)
- for each table row:
- add a unix command to the first column (e.g. pwd)
- add a brief description in the second column (e.g. print working directory)
View the result in a browser, replacing USERNAME with your IU username:
https://cgi.luddy.indiana.edu/~USERNAME/first-website/unix.html
👀 Notice that the file name is now referenced in the URL
Because we are no longer on the default “index.html” page!
06 Test the Links in Your Site
In the browser, do the links between the two pages work?
If not, make sure you are using a relative path—one based on where files are in relation to each other.
Hint: Use relative paths
Since
index.htmlandunix.htmlare in the same directory, we can use the file names directly:<p><a href="unix.html">Unix</a></p>Or we can be precise that the file is in the same directory with
./:<p><a href="./unix.html">Unix</a></p>
07 Add styling using CSS
Navigate to styles.css and add the following:
body {
    background-color: gainsboro;
    font-family: Seravek, 'Gill Sans Nova', Ubuntu, Calibri, 'DejaVu Sans', source-sans-pro, sans-serif;
    font-size: x-large;
    padding: 2.0rem 4.0rem;
}
Save and view the results in the browser.
08 Is the CSS working?
Does the site look how you expected? Is the CSS loading in correctly?
The style.css should be in the css/ directory. How do we adjust the href link to make it load in correctly?
<link rel="stylesheet" href="style.css">
Hint: Relative links!
When a file is in a directory, we must specify the path to that file.
<link rel="stylesheet" href="./css/style.css">
09 Nicer tables
Edit the css/style.css file again, this time adding CSS to make our table of Unix commands look nicer:
table {
    font-family: ui-monospace, 'Cascadia Code', 'Source Code Pro', Menlo, Consolas, 'DejaVu Sans Mono', monospace;
    width: 100%;
    background-color: #efefef;
    border-collapse: collapse;
}

td {
    padding: 0.3em;
    border: 3px solid #555;
    vertical-align: top;
}
Wrapping up
Did any of this feel annoying or like a lot of work? 😡 😤 🤬
We’ll be upgrading our text editor to VS Code soon, and then most of the struggle with file editing will fade away. The goal is to understand what the tools you use are doing for you and to build your workflow (as you learn) to speed up the boring or repetitive parts, without compromising your decision making.
Further Reading
- Neal Stephenson, “In the Beginning… was the Command Line”
Footnotes
“People” on a Linux server is broadly defined. For example: some accounts could be shared between multiple human users, while other accounts are reserved for “bots” that act on behalf of other users. The most common “bot” is the root account, which (if you’re following best practices) is not used directly, but might be invoked in specific situations to change the system: like when an administrator on the server needs to upgrade software or install a new package.