Forms I - POST and Input
Our web application includes ten recipes, but we promised in the About page that a new feature to add your own recipes was coming soon! Let’s add a page called “Add Recipe” that allows a user to put more recipes on the site.
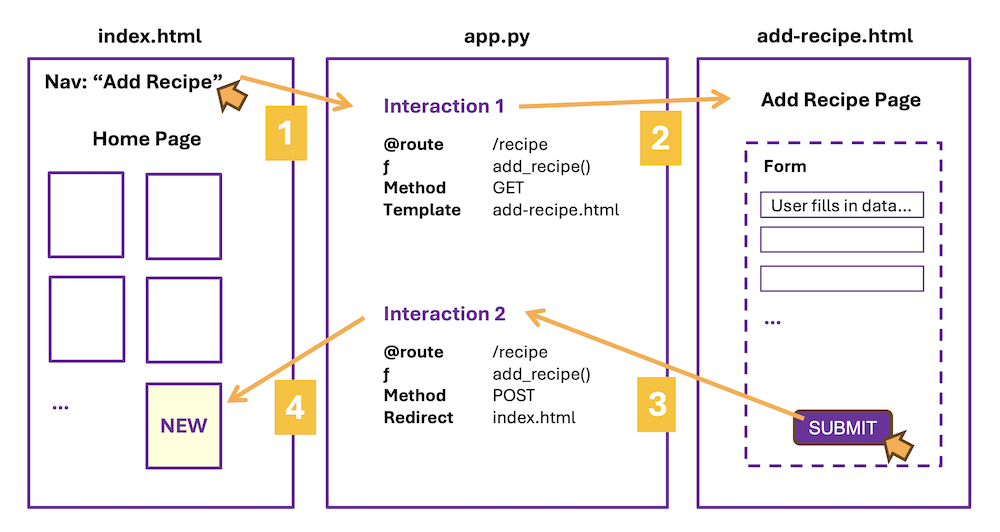
This time we will create a new route that will handle two different user interactions. One to view the template page (Arrows #1 and #2), and one to process the form data. (Arrows #3 and #4) The function for this route will look at the method used to connect with the route, then decide what to do for each scenario.
INTERACTION 1: Create the user pathway to access a new page called “add-recipe.html”
The first user interaction is similar to what we have done so far. When a user clicks on a link in the navigation bar, they should see a page with a form on it for adding recipes.
Follow Along with the Instructor
Practice with the instructor. Not an exact replacement for the written directions below.
- Practice creating the first to two interactions needed to add a recipe to our website.
Add a link in the navigation to “Add a Recipe”
- Links in the navigation live in base.html because they are present on all web pages
- The link should go to the function
add_recipein your routes
Create the route
- The route will be for
/add-recipe - The function is
add_recipe() - The template rendered will be
add-recipe.html
Q: Does this route have any variables we need to handle?
Nope. If it did, it would look more like /add-recipe/
We only need to be concerned with the basics on this route for the moment.
Make an HTML template page called ‘add-recipe.html’
The template page should:
- be placed in the templates folder, and make use of required Jinja template code
- have a page title “Add Recipe”
- contain the following content:
<h1 class="display-4">Add a Recipe</h1>
<p class="lead">Add your favorite recipes to <em>Make This Now!</em></p>
Test this interaction out by running your Flask app before moving to the new interaction. Directions for starting a development server are in the READ.ME.
INTERACTION 2: Creating a form
The first part to creating a form is to add a space for it to live in your HTML code. The start of the interaction is when the user clicks the “Submit” button within the form.
Follow Along with the Instructor
Practice with the instructor. Not an exact replacement for the written directions below.
- Practice creating the first to two interactions needed to add a recipe to our website.
Add a form to add-recipe.html template
Add this code to add-recipe.html:
<!-- add underneath existing text content -->
<form action="{{url_for('add_recipe')}}" method="post" enctype="multipart/form-data">
   ...
    <div class="mt-4">
        <button class="btn btn-primary" type="submit">Submit</button>
        <button class="btn btn-secondary" type="clear">Clear</button>
    </div>
</form>
-
The action attribute in the FORM element uses Jinja to access the route we just created!
-
Method “POST” means that the data should be sent in a more secure method than the standard “GET” method, which is what Flask defaults to when we send data between pages.
-
“Enctype” is set so we are encrypting the data specifically as form data. It’s not absolutely required, but will usually make your form work better and we’d like you to include this option.
-
At the bottom of your form, we have a box with two buttons:
- Submit - when the user clicks this button, the ACTION on the FORM is called
- Clear - when the user clicks this button, the form elements are cleared out, no additional code is required for this to work, and it’s a standard interface option on many forms
This second interaction is kicked off by the user clicking the Submit button, which activates the action set in the FORM element.
DATA: Adding elements to the form
When we want to get data from the user, and not just from an external source like a CSV, we need to create a form that includes a variety of elements designed for collecting data for the user. Open up the documentation and familiarize yourself with what options are available.
See if you can find where Bootstrap talks about the most used types of form elements:
- text input, for anything that is a short piece of text
- text area, for longer sentences or paragraphs of text
- select, which is how you make a dropdown
- checkboxes, for when you want the user to select zero-all options
- radio buttons, for when you want the user to only select one option from many
In the add-recipe form, we will make use of an input (text), textarea, radio button, input (url), and input (file). Notice that three of these are the same type - INPUT!
The input element is flexible that way. It can accept a date, a color, an email, etc.. anything that can be submitted as a short string data type. By specifying, for example, type ‘date’, the INPUT element changes in the interface to pop up a mini calendar for the user. For type ‘email’, the INPUT will do some simple validation to make sure there is an “@” as part of the address.
Structure of form elements
The naming is important. You get to come up with the names, but here are the rules:
-
The for attribute in LABEL and the id attribute in INPUT MUST MATCH - this is how the form knows which label goes with which form element.
-
The name attribute in INPUT becomes the name of the variable when we pull in the form’s data. It is common for this to be the same as ID and FOR, but it can be different.
<div class="mb-3">
    <label for="recipe-name" class="form-label">Recipe Name:</label>
    <input type="text" class="form-control" name="recipe-name" id="recipe-name" placeholder="Name of Recipe">
</div>
Also helpful to know, a placeholder attribute can be used to give the user an indication of what kind of data is expected.
In general, we want the label and associated form elements to be visually grouped on the page. Notice the DIV with the Bootstrap spacing class on it wrapped around both the LABEL and INPUT.
Add these elements to the form in add-recipe.html
<!-- add to form -->
<div class="mb-3">
    <label for="recipe-name" class="form-label">Recipe Name:</label>
    <input type="text" class="form-control" name="recipe-name" id="recipe-name" placeholder="Name of Recipe">
</div>
<div class="mb-3">
    <label for="description" class="form-label">Brief Description:</label>
    <textarea class="form-control" id="description" name="description" rows="3"></textarea>
</div>
<fieldset class="row mb-3">
    <legend class="col-form-label col-sm-2 pt-0">Recipe's Rating:</legend>
    <div class="col-sm-10">
        <div class="form-check form-check-inline">
            <input class="form-check-input" type="radio" name="rating" id="rating-1" value="1">
            <label class="form-check-label" for="rating-1">
                1
            </label>
        </div>
        <div class="form-check form-check-inline">
            <input class="form-check-input" type="radio" name="rating" id="rating-2" value="2">
            <label class="form-check-label" for="rating-2">
                2
            </label>
        </div>
        <div class="form-check form-check-inline">
            <input class="form-check-input" type="radio" name="rating" id="rating-3" value="3">
            <label class="form-check-label" for="rating-3">
                3
            </label>
        </div>
        <div class="form-check form-check-inline">
            <input class="form-check-input" type="radio" name="rating" id="rating-4" value="4" checked>
            <label class="form-check-label" for="rating-4">
                4
            </label>
        </div>
        <div class="form-check form-check-inline">
            <input class="form-check-input" type="radio" name="rating" id="rating-5" value="5">
            <label class="form-check-label" for="rating-5">
                5
            </label>
        </div>
    </div>
</fieldset>
<div class="mb-3">
    <label for="url" class="form-label">Full Recipe URL:</label>
    <input type="url" class="form-control" name="url" id="url" placeholder="https://www.recipe.com">
</div>
<div>
    <label for="recipe-image" class="form-label">Recipe image:</label>
    <input type="file" id="recipe-image" name="recipe-image" accept="image/*">
</div>
<!-- this code should be followed by the two buttons and close form tag -->
Take a look at add-recipe.html in a browser to make sure your form looks ok before moving on. You may need to refresh the page to see the updates.
INTERACTION 2: Routing the form’s data
In this second interaction, we begin with the user clicking “Submit”, which activates the form. The form action is set to call the same function we called earlier to view the add recipe page! So we will need a way to decide WHICH INTERACTION is happening when.
Do you recall that the method set in our FORM is “post”?
The logic, then, goes like this:
- If the method is “post” then the user has clicked the “Submit” button in the form.
- If the method is not that, then we just must want to view the add-recipe.html page.
Begin by updating the /add-recipe route:
@app.route("/add-recipe", methods=['GET', 'POST'])
def add_recipe():
    if request.method == "POST":
        # process the form data, then go to the home page
        return redirect(url_for('render_index'))
    else:
        # view the add recipe page
        return render_template("add-recipe.html")
Notice that we are using a new library called request to check the method? We’ll also be using one called redirect soon.
Update the import at the top of app.py in include “redirect” and “request”:
from flask import Flask, render_template, url_for, redirect, request
Update the route to grab the form’s data
To grab the data from the form, we will use request again:
recipe_name = request.form['recipe-name']
recipe_name(with an underscore) is the name of a local Python variablerecipe-name(with a dash) is the name of the name attribute in the HTML form element we want to get the data from
This difference between the underscore and dash seems annoying but it’s meant to help differentiate between your program’s code and the code meant for the interface.
Grab the form’s data and place it into a dictionary
Update the if-statement in add_recipe() to grab the form data:
@app.route("/add-recipe", methods=['GET', 'POST'])
def add_recipe():
    if request.method == "POST":
        recipe_name = request.form['recipe-name']
        recipe_slug = sluggify_recipe_name(recipe_name)
        # add variables for the description, rating and url

        new_recipe = {
            'recipe_slug': recipe_slug,
            'recipe_name': recipe_name,
            'description': description,
            # the recipe image is being set to a default image
            # you have this image - it was included in recipe-images (ZIP)
            'recipe_image': 'images/recipe-images/null_image.jpg',
            'rating': rating,
            'url': url
        }

        # add the new dictionary to our CSV data

        return redirect(url_for('render_index'))
    else:
        return render_template("add-recipe.html")
You’ll also need to add the helper function for the sluggifying 🐌:
def sluggify_recipe_name(name: str) -> str:
    """Convert a recipe name to a "slug" string

    Recipe names typically have spaces, which look like %20 in a URL. This
    looks terrible, so we will replace the spaces with a hyphen: `-`.

    >>> sluggify_recipe_name("Three Bean Chili")
    'Three-Bean-Chili'
    >>> sluggify_recipe_name("S'mores")
    'Smores'
    """
    return name.replace(" ", "-").replace("'", "")
Attempt to add the code to grab data from the rest of the form elements on your own first.
Solution to Add the Rest of the Variables
description = request.form['description']
 rating = request.form['rating']
 url = request.form['url']
We got the data, what’s next?
Getting and then using the data from a form goes like this:
- collect the data together into a dictionary (provided for you)
- add the new dictionary to our CSV data
- redirect to the index page, which will load in the updated CSV data
Note: We put the data into a dictionary for this demo, because the data coming out of our CSV is a dictionary of dictionaries, but it just depends. In some situations a list could be better. In general if you have multiple pieces of data, you’ll want a way to group them together for easier access and to make it easier to pass that information on to the next step – and in Python that means a list or a dictionary.
Add the new data to our CSV
We now need to store the new data along with the rest of our recipe data – and for this demo that means in the recipes.csv.
Add this function under get_all_recipes() to help us with this next step:
def set_all_recipes(all_recipes):
    with open('recipes.csv', mode='w', newline='') as csv_file:
        writer = csv.DictWriter(csv_file, fieldnames=[
            'recipe_slug', 'recipe_name', 'description', 'recipe_image', 'rating', 'url'])
        writer.writeheader()
        for recipe in all_recipes.values():
            writer.writerow(recipe)
See if you can now complete the if-statement (if the method is POST):
- get all of the recipes in our CSV
- add a new item to our nested dictionary, the new item will be the
new_recipedictionary containing the data from the form - set the CSV to be the updated data
Try this out before looking at the solution.
Solution
all_recipes = get_all_recipes()
 all_recipes[recipe_name] = new_recipe
 set_all_recipes(all_recipes)
Display the results
Since we already have a function that handles grabbing the recipes data and displaying all available recipes on the home page, we don’t need to render a template. We can just redirect the user to the function that is already handling this interaction.
# as found in add_recipe()
return redirect(url_for('render_index'))
Quiz Yourself: Where is the Data? 🤔
Is data being passed between the start and end of each orange arrow? If so, what is that data? Answer for each of the four arrows:
Interaction 1: Arrow #1
Is data being passed between the user clicking on “Add Recipe” in the navigation bar and the “add_recipe()” function in our “/add-recipe” route?
Answer to #1
No
Interaction 1: Arrow #2
Is data being passed between the “add_recipe()” function in our “/add-recipe” route and the template “add-recipe.html”?
Answer to #1
No
Interaction 2: Arrow #3
Is data being passed between the form in “add-recipe.html” and the “/add_recipe” route?
Answer to #3
YES, the data is being passed as POST data, BUT NO, it is not being passed in from the url_for() where the user clicked.
We will use the request library to pull in the data from within the route's function.
Interaction 2: Arrow #4
Is data being passed between the “/add-recipe” route and the home page template “index.html”?
Answer to #4
No. (Not exactly)
We updated the CSV within our route's function, but the index route will pull in the CSV data. No need to pass it along in the url_for().