Forms II - Standardization and Data Types
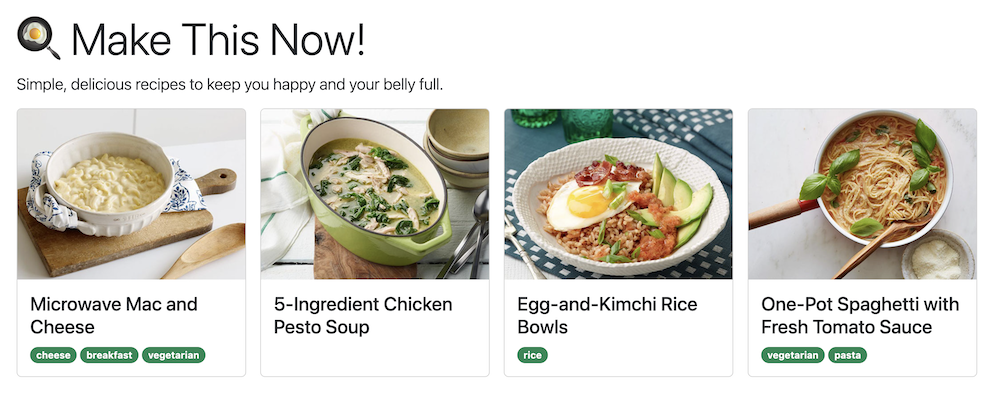
As both practice and a way to discuss form validation, we’ll add a form for adding a tag to a recipe. This tag will appear on the home page, and also on the details page for each recipe. For example, a recipe with no meat might be tagged “vegetarian”.
We’ll work with three interactions:
- Updated interaction: pass along new data through the
/recipes/<recipe>route - New interaction: Add tags to the current recipe
- New interaction: Allow the user to create and add their own tags to recipes
INTERACTION 1: index.html to recipe.html using route “/recipes/< recipe>”
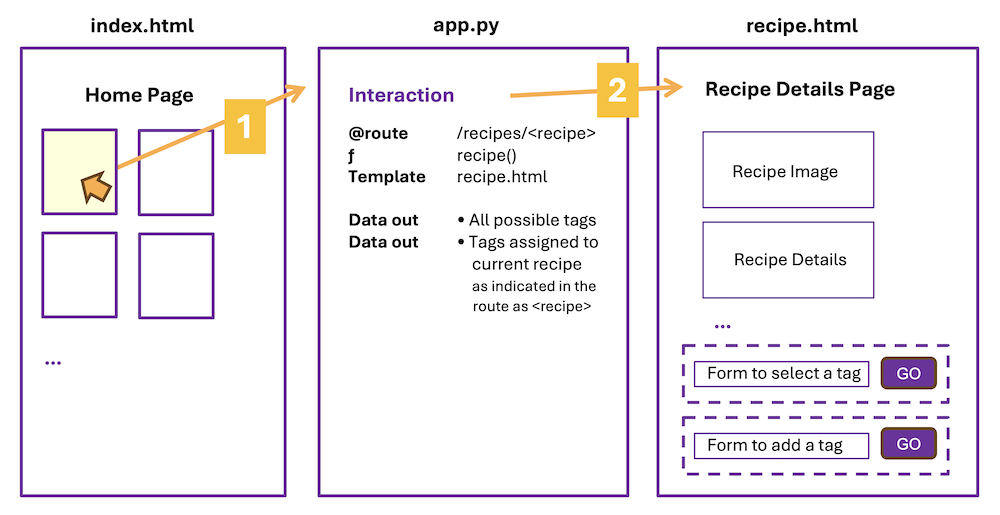
1. Update data available
We will first add the following data to the root directory of your application.
Data showing which tag is attached to which recipe
We could adjust recipes.csv to accept tags, but because a recipe can have more than one tag, it makes sense to have a separate CSV for the tags. This new CSV called tagged.csv has two columns: (1) a recipe that has been tagged and (2) which tag was used. If we added this kind of data to recipes.csv it would have to be in the form of a list, which would then require more work to access.
Data listing all tag possibilities
Next up, we are going to need a list of possible tags. Otherwise our USER can choose and do we really want a tag that says “makes me want to 🤮”? Because that is the tag Erika’s son Max suggested we add. Let’s say we stick to the list we’re giving you for now. 😌
Download tagged.csv and tags.txt and add these files to your file structure:
root
└── vscode
└── flaskapp
├── venv
├── recipes.csv
├── supplies.csv
├── tagged.csv
├── tags.txt
└── ...
Once you place these two data sources into your lecture project, look at the files in VS Code. You’ll have a better idea of what we are working with.
- In tagged.csv, we see two columns of data. A recipe’s name in slug format, followed by the name of the tag.
- In tags.txt, we see possible tags displayed as one string per line.
Note how we are connecting these data sets
Notice that we are referring to recipes in “tagged.csv” by their slug 🐌 and not their recipe name, and that “recipes.csv” also has a slug as part of the data. A consistent way to reference each item in our data will help us connect the two data sets together. (More on this in Unit 3!)
Follow Along with the Instructor
Practice with the instructor. Not an exact replacement for the written directions below.
- Update the recipes route to include tag data.
2. Update the route to pass tagged data to recipe.html
Right now, recipe.html is receiving a dictionary that contains details for a single recipe. We also want this page to have access to the tag-related data we added to our app.
Update your /recipes/<recipe> route to send additional data along to “recipe.html”:
@app.route('/recipes/<recipe>')
def recipe(recipe=None):
    all_recipes = get_all_recipes()
    if recipe and recipe in all_recipes.keys():
        one_recipe = all_recipes[recipe]
        one_recipe['rating'] = '⭐️ ' * int(one_recipe['rating'])
        return render_template(
            'recipe.html',
            one_recipe=one_recipe,
            tagged_as=csv_to_tbr()[recipe],
            all_tags=sorted(get_tags())
        )
    else:
        return redirect(url_for('index'))
In the data being passed along to the recipe.html template by render_template():
- “one_recipe” was there before and passes a dictionary with details about the chosen recipe
- “tagged_as” are the tags from tagged.csv, but ONLY for the current recipe
- “all_tags” is a sorted list of all possible tags (strings)
Notice that we are using some functions you might not recognize. These are helper functions we wrote to manage the tags and tag data.
- “csv_to_tbr” gives us a dictionary where the recipe is the key, and the tag associated with the recipe is the value - notice we are only passing along the tags for the recipe we are going to view
- “get_tags” loads the tags from a text file and creates a list
For your code to actually work, you’ll need to import a new library:
from collections import defaultdict
# add directly above 'import csv' at the top of app.py
Then add these helper functions to app.py:
# add these helper functions near where your other helper functions live in app.py
def get_tags() -> set[str]:
    """Load all tags as a set of strings"""
    with open("tags.txt", newline="") as fh:
        return set(fh.read().splitlines())

def csv_to_tbr() -> dict[str, set[str]]:
    """Turn a CSV of key-value pairs into a dictionary representing
    "tags by recipe", or "what tags does a recipe have?"

    i.e.:

    by_recipe = {
        "Microwave-Mac-and-Cheese": {"vegetarian"},
        "One-Pot-Spaghetti-with-Fresh-Tomato-Sauce": {"vegetarian"},
    }
    """

    # The `defaultdict` is optional here, but using it means we can avoid
    # writing a lot of boilerplate. i.e.: If a key is not present in the
    # defaultdict(set): the tags are equal to the empty set.

    by_recipe = defaultdict(set)

    with open("tagged.csv") as csvf:
        for row in csv.DictReader(csvf):
            by_recipe[row["recipe"]].add(row["tag"])

    return by_recipe
Now that two additional pieces of data are being passed along to “recipe.html”, we need to write Jinja to handle them in the template.
Quiz: Test yourself
What are the variable names for the data being passed to the recipe.html page?
    one_recipe - dictionary with recipe details
    tagged_as - a list of tags applied to current recipe
    all_tags - a list of valid tags
3. Update recipe.html to display any tags for the chosen recipe
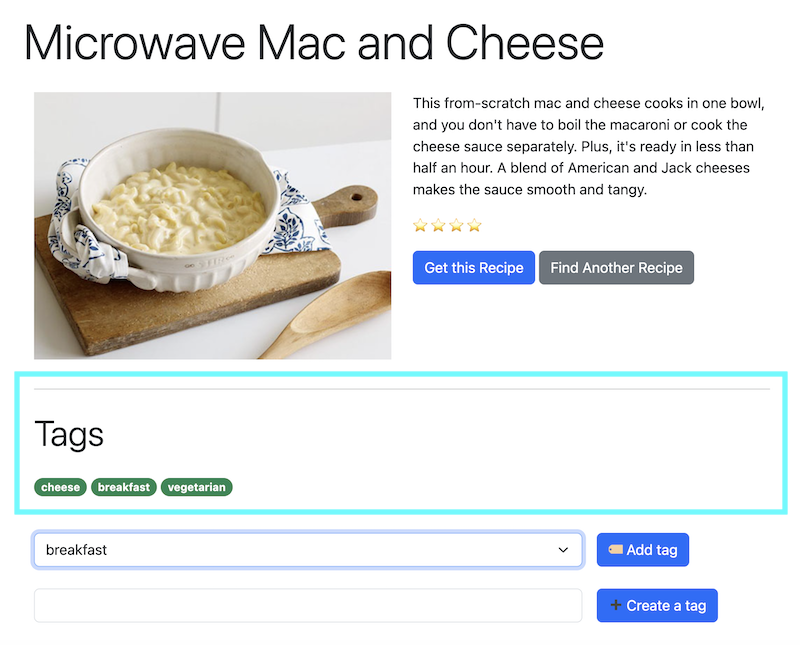
Directly under the HTML content in recipe.html, let’s make space to display tags associated with the current recipe. To display these tags, we will need to access the “tagged_as” data we passed to this page.
    <!-- existing code for displaying recipe details -->
    <hr>
    <h2 class="display-6 my-4">Tags</h2>
    {{tagged_as}}
ALWAYS a good idea to “Jinja print” out the data and make sure (1) it shows up and (2) it is the format you expected.
Format the tags
- Using Jinja, display each tag. (Q: What data type is the “tagged_as” data?)
- Use Bootstrap to style each tag:
<span class="badge rounded-pill text-bg-success">PLACE TAG HERE</span>
Solution
    {% for tag in tagged_as %}
    {{ tag }}
    {% endfor %}
Data validation
What if the recipe is not tagged? We also need to make sure that if the tagged data is empty, that we are handling that scenario.
- Use an if-statement in Jinja to display a message such as “No tags yet” if the tagged data is empty
Solution
    {% if not tagged_as %}
    No tags yet
    {% endif %}
Using a conditional to check if the variable is empty, or if data is present, gives us a way to display different HTML depending on the result of that check.
INTERACTION 2: recipe.html to recipe.html using route “/api/tags/< recipe>/add”
In this interaction, the user is able to tag a recipe.
Follow Along with the Instructor
Practice with the instructor. Not an exact replacement for the written directions below.
- Create a route for tagging a recipe from recipe.html.
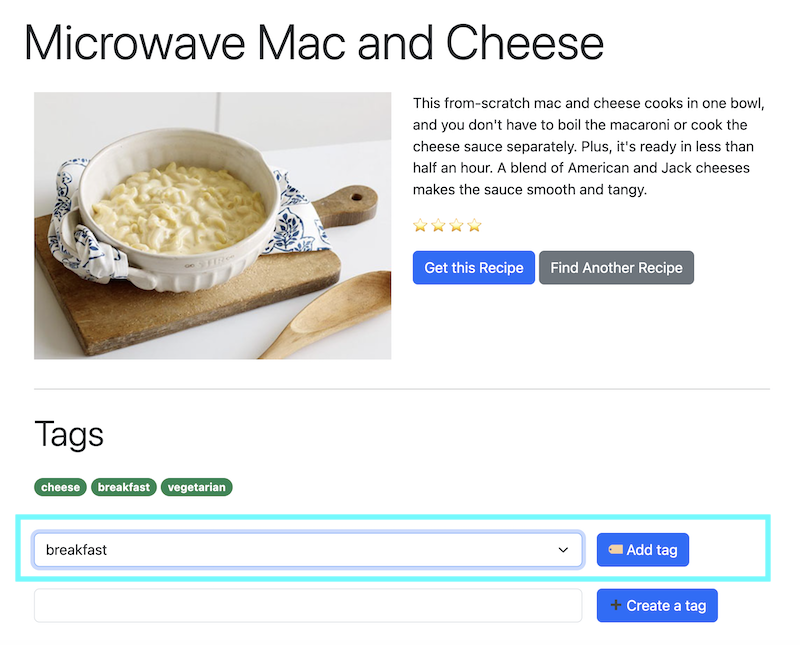
1. Add a form to “tag” a recipe
In the details page for each recipe, let’s add a form for a user to tag a recipe as “vegetarian” or as a meal that’s suitable for “breakfast”.
To begin the interaction, when a user is on the recipe.html page, they can use a simple form to add a tag to the recipe page they are on. This will consist of a dropdown menu (SELECT) and a button.
Start by adding a form to recipe.html underneath the current content:
<!-- Add underneath where the tags are displayed -->
<form action="" method="POST" class="row g-3 my-4">
    <div class="col-9">
        <select name="tag_name" id="tag_name" class="form-select" aria-label="all available tags">
            <!-- Complete this dropdown -->
        </select>
    </div>
    <div class="col-3">
        <button type="submit" class="btn btn-primary">🏷️ Add tag</button>
    </div>
</form>
- the form action will eventually call a function, but we aren’t ready for that yet - if we add the function before the function is written we will get an error
Data validation: limit choices with a dropdown menu
Another way to improve our code is to make sure the user cannot give us a bogus tag.
- In this form, complete the dropdown to allow users to select from one of the tags available in the
all_tagslist. Use an option/value set up and not just an option please.
Solution
{% for tag in all_tags %}
{% endfor %}
Anytime a user can type into an input, mistakes will be made. By providing only valid options, we can eliminate the user attempting to select a tag that isn’t there.
2. Write a new route to handle a user tagging a recipe
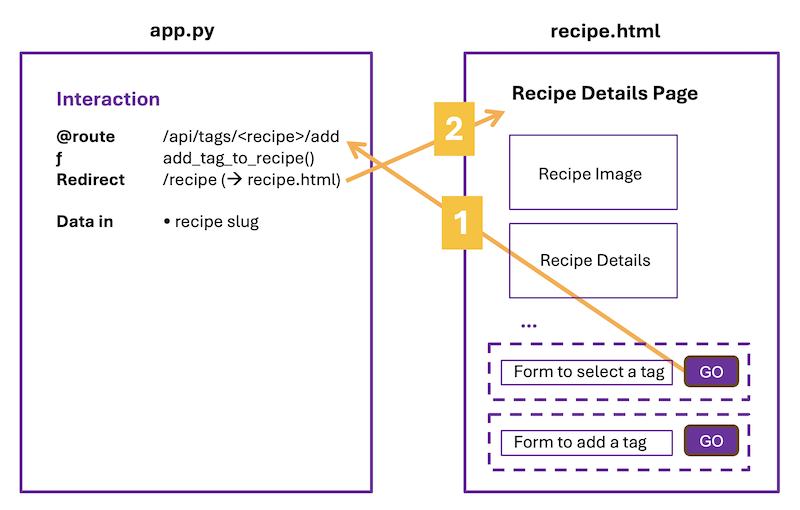
When the user clicks on the “Add Tag” button in recipe.html, the form action calls the function “add_tag_to_recipe()”, and passes along the slug for the current recipe.
First update the form’s action:
<form action="{{ url_for('add_tag_to_recipe', recipe=one_recipe['recipe_slug']) }}" method="POST" class="row g-3 my-4">
- The form action is Jinja brackets around a url_for() calling the function
add_tag_to_recipe. - The url_for() should pass along a variable called ‘recipe’ that contains the visible recipe’s slug (the dashed name for the recipe, and key for our CSV data)
The function add_tag_to_recipe() will:
- grab data form form - only one element “tag-name” in this case
- update the data in the CSV - should now include the tag on the current recipe
- redirect back to see the results - return to the recipe page
Add this new route to app.py:
@app.route("/api/tags/<recipe>/add", methods=["POST"])
def add_tag_to_recipe(recipe: str):
    added_tag = request.form["tag_name"]

    # get all tagged recipes data from CSV
    tbr = csv_to_tbr()
    # add the new tag to current recipe
    tbr[recipe].add(added_tag)
    # update the CSV with new data
    tbr_to_csv(tbr)

    return redirect(url_for("render_recipe", recipe=recipe))
You’ll also need to add this helper function to app.py for this route to work. It takes a dictionary of tags and updates the CSV with the modified data.
def tbr_to_csv(tbr: dict[str, set[str]]) -> None:
    """Tags-by-Recipe dictionary to a CSV file"""
    with open("tagged.csv", "w") as csvf:
        writer = csv.DictWriter(csvf, fieldnames=["recipe", "tag"])
        writer.writeheader()
        for recipe in tbr:
            for tag in tbr[recipe]:
                writer.writerow(
                    {
                        "recipe": recipe,
                        "tag": tag,
                    }
                )
3. Redirect back to recipe.html to see the result
Once the data has been updated and the new tag (probably) added to the recipe we were on, we want to send the user back to the recipe page to see the result.
@app.route("/api/tags/<recipe>/add", methods=["POST"])
def add_tag_to_recipe(recipe: str):
    ...
    return redirect(url_for("render_recipe", recipe=recipe))
We don’t need to render the template here because we already have a “recipe” route that handles that pathway.
INTERACTION 3: recipe.html to recipe.html using route “/api/tags/< recipe>/add”
In this interaction, the user will type in a new tag to add to the list of possible tags.
Did you notice that interaction 2 and 3 are the same path? Because most of the interaction will be the same, we can use the same route to handle both situations.
Work Along with the Instructor
Practice with the instructor. Not an exact replacement for the written directions below.
- Create a route to let the user add to the list of tags for a recipe.
Add a form for a use to enter a new tag

Add this code to recipe.html underneath the current content:
<form action="{{ url_for('add_tag_to_recipe', recipe=one_recipe['recipe_slug']) }}" method="POST" class="row g-3">
    <div class="col-9">
        <input class="form-control" type="text" name="tag_name" id="tag_name">
    </div>
    <div class="col-3">
        <button type="submit" class="btn btn-primary">➕ Create a tag</button>
    </div>
</form>
Route the form to add_tag_to_recipe
NOTICE THAT THE ROUTE AND THE INPUT ELEMENT’S NAME ARE EXACTLY THE SAME!!
All we are doing here is saying instead of choosing from a dropdown, the user can now type in a name instead. We are swapping one way to pass that name along to the route for another. What will change is what we do once we get that tag name.
Add this code to the end of add_tag_to_recipe() just before the redirect:
    if not added_tag in get_tags():
        register_new_tag(added_tag)
The logic will now look like this:
- if the tag is from our dropdown, we tag the recipe
- if the tag is not from our dropdown, we add it to our list of tags, then tag the recipe
A decision here about whether the tag is included in our list of tags is all it takes to handle both interaction 2 and 3.
For this code to work, you will also need a helper function to add the tag to “tags.txt”:
def register_new_tag(tag_name: str) -> None:
    """Add a new `tag_name` in the set of available tags (i.e. `tags.txt`)"""
    with open("tags.txt", "a", newline="") as fh:
        fh.write(tag_name + "\n")
What could we improve about adding a new tag?
- We aren’t checking what the user enters AT ALL - they could be entering code to mess with our web app, or adding a couple of unfavorable 🤢🤮😡 emojis!
It’s important to understand that although HTML does provide some validation within form elements, most hackers do not use the interface but instead go directly to your app code.
Ideally, we should validate:
- in the HTML to make the experience better for the user
- in Python/Flask to double check the data coming in from forms, and to make sure that data is valid / clean / not malicious before adding it to our data source (currently a CSV, later on a database).
We have done some simple validation throughout creating the routes to add tags to our app, but clearly we could do more. The first step to knowing what to do is knowing what to ask.
Data validation. Error checking.
What if when we send “recipe” data to “add_tag_to_recipe()” the recipe information is missing, or is not a recipe in our app?
What if when we request the form data from “tag-name”, there is nothing there?
Error checking and validation of data in this function can mean the difference between a program that runs and one that does not. Anytime we work with data coming in from somewhere else, we need to check that it is what we expect, and write code to handle what happens when it is not.
When you test your code, the tests should check for circumstances that mostly don’t happen, but could happen.
Add code to “add_tag_to_recipe()” to check the following:
- is there data for “add_tag”?
- is there data for “recipe”?
- is the recipe a recipe in our recipe data?
You’ll likely need to look at our possible solutions for this, but do think about the approach first. FYI, in our solutions we are returning a “400” status code, which means general error.
Possible Solution
    if not added_tag:
        return "Bad request, missing tag name", 400
    if not recipe:
        return "Bad request, missing recipe", 400
    if recipe and (recipe not in get_all_recipes()):
        return "Bad request, unknown recipe", 400
FINAL STEP: Improve the Recipe Listings
We now have tag data associated with each recipe. The final step is to display tags on the home page as well.
Update the index route in app.py to pass along the new data about tags:
@app.route("/")
def index():
    all_recipes = get_all_recipes()
    return render_template(
        "index.html",
        all_recipes=all_recipes,
        tags_by_recipe=csv_to_tbr()
    )
Note that we already have a helper function to grab all tags from a CSV.
In “index.html” update each recipe to display any tags it may have. Paste the following code inside the DIV with class “card-body” and after the H2 with class “card-title” that is already there:
<p class="card-text">
    ...
    <span class="badge rounded-pill text-bg-success">TAG NAME HERE</span>
    ...
</p>
Once this code has been pasted in, complete the code:
- use Jinja and the “tags_by_recipe” data to display tags FOR EACH recipe
- note how each tag is represented using Bootstrap
Possible Solution
        {{all_recipes[recipe]['recipe_name']}}

            {% for tag in tags_by_recipe[recipe] %}
            {{ tag }}
            {% endfor %}
Using Variables with Jinja
Though not necessary for our lecture app, this technique might help you with the project app!
Sometimes, you want to be able to access part of the data passed from the route to the template, then make a decision. For example, we might need to check if the data came through at all. Or let’s say we want to have all recipes tagged as “cheese” have additional tips for if you want to make the recipes dairy-free (so a CHOICE is involved). Or this can be very helpful when wanting to pre-load data into a form.
Create a Jinja variable
Create a Jinja variable to hold the value:
{% set name = recipe['name'] %}
Then use the variable elsewhere in your HTML template:
<input … value="{{name}}">
In this example, the input has a default value set by a variable. It might be a string, or it might be an empty string if the value is not there.
Additionally, here is a one-line way to do this kind of decision making in Jinja:
<option {% if recipe['name']=="Tomato Soup" %}selected{% endif %} value="tomato_soup">Tomato Soup</option>
In this example, the option appears selected if the data matches the choice.
Or you can even complete this thought in a slightly different way using a more sophisticated Jinja syntax:
<option {{ 'selected' if recipe['name'] == 'Tomato-Soup' else '' }} value="tomato-soup">Tomato Soup</option>
For more Jinja constructions, see the Jinja documentation.