Server Routing in Flask
Today we are going to work on building a web application in class that is very similar to what we will ask you to do for your course project. We’ll continue to work on this site throughout the rest of the semeester.
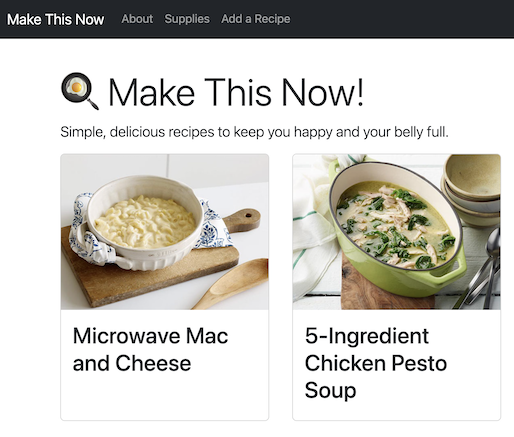
The in-class web app is a recipe website called “🍳 Make This Now!” A repository of the code for this site will be provided, so don’t worry about the code – worry about whether you understand what the code does, and how to apply the techniques we are learning to your own project.
Do not skip this practice.
This web app we will build together IS YOUR PRACTICE. That time and effort will keep you from hours upon hours of wasted time and frustration when you then work on your course project. The risk is low, and the reward is high.

We have to do what??
We now have a passing familiarity with the essential technologies needed to build a web application with the Flask framework:
- Unix / Command Line and understanding a parent-child tree-like data structure
- HTML + Bootstrap (which includes CSS & JS) for the interface
- Server access (Silo) - so we have somewhere to place our application
- Git & Github - for source code management and keeping track of versions
- VS Code - a code editor that can handle multiple file types
- Python - our programming language - including how to test code, work with modules, handle structured data, and read / write to files
- Flask - our application framework - that we set up with
pipandvenv
(By the end of the semester, we will have added two more items to this list - SQL and databases - to handle the backend of our web application.)
Wheh. Creating a web application is a lot of work, and involves a lot of techniques and technologies.
So why bother?
Why not just make a static website using HTML, CSS and JS?
Why Creating a Web App is Useful
People build large, scalable websites (web apps) when they want to:
- make use of a database - more on that in Unit 3
- reuse parts of the code - for example when a navigation bar is repeated on multiple pages
- have more control over the URL - and exactly what is displayed on each page depending on the circumstances
These are all reasons to choose a web application framework. In this chapter, we are going to talk about item three,“we want more control over what is displayed when”, which is called Routing.
Note: you absolutely can make a simple website with just HTML, CSS, and JS. In fact, many projects are not large enough or complex enough to justify the setup time needed, but sometimes there might be a framework already in place, or the pressure to use the new shiny thing wins out. (Cause it’s shiny ✨)
Routing
Routing allows us to control what happens in our application when the the user clicks a link.
In a simple website, when a user clicks on a link and the browser loads the page. THERE IS NO MIDDLE STEP.
In a web application, that step in-between the user’s click and the browser loading a page is THE MOST IMPORTANT STEP.
- The user SEES 👁️ what they want to do on the site and clicks a link.
- Think of the
app.pyfile as the BRAIN 🧠. Decisions are made related to data and content. - Then the browser has a HAND 👋 in making it all happen.
What happens in a route?
This routing process consists of directing these three steps, starting with the user interaction:
- User clicks on a link
- This directs to a function in our web application (
app.py) - The function displays (renders) the desired HTML page
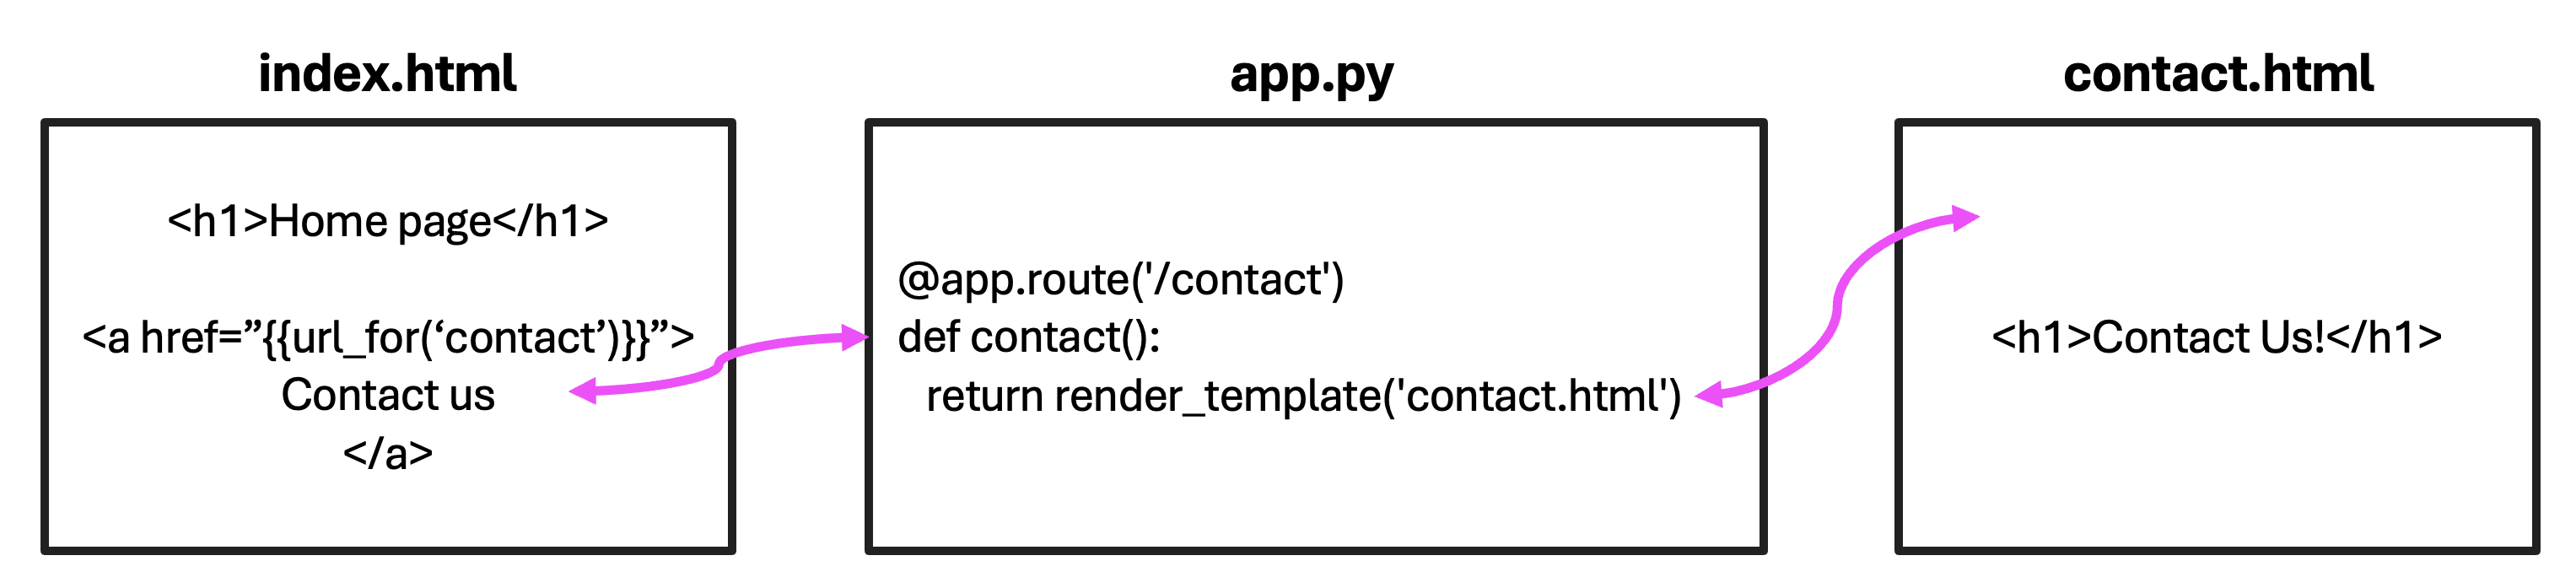
The link the user clicked on, in this case, resolves to a URL that looks like http://127.0.0.1:5000/ locally, or perhaps with its own URL, like https://www.make-this-now.com/, if it’s hosted on a web server.
In our app.py, the function contact() is called, which in turn returns a call to a function (render_template()), which display the web page contact.html in the browser.
We code this process in app.py like so:
@app.route('/contact')
def contact():
   return render_template('contact.html')
Formatting a route
You may have noticed the word ‘contact’ is used three times; once for the route, once for the function and once for the HTML page displayed. We have three different parts and they all have the same name?!
It’s true, and we could write the route like this to avoid that:
@app.route('/contact')
def show_contact():
   return render_template('contact-info.html')
The names DO NOT have to exactly match. There is no requirement that they do. However, it can often make sense to do so, and you’ll find this is a common practice, because we will have a lot of names to keep track of and it is easier to tell which pieces need to be connected if they all have the same name.
Now you know 💫 and can choose the convention that makes the most sense to you.
Where do routes live in my application?
Routes live in the flaskapp directory of your starter project in a file called app.py.
app.py
# Copyright © 2023-2024, Indiana University
# BSD 3-Clause License

from flask import Flask, render_template

app = Flask(__name__)

@app.route("/")
def index():
    return render_template("index.html")
-
At the top of
app.pyis a line importing Flask, followed by a library we will need -
The next line creates a Flask data object that will help us control our application.
-
The first use for this
appobject is to make a route for the home page. (Notes: The@indicates this is Python decorator.\means the root of the file structure. And remember the home page for any website is usuallyindex.html.)
These last three lines of this code are saying when the user clicks on the URL for our website (e.g. “https://www.make-this-now.com”), we want our application to DO SOMETHING. Action implies verb, which in programming means a function. What do we want the function to do? We want it to display the home page index.html.
Want another page in your web app? Make another route. Just add it underneath the previous route.
@app.route('/about')
def about():
   return render_template('about.html')
We can add as many routes to our application as we would like to.
Routes are activated by the user
Not all routes will run all the time. For the route code in the app.py to run, the USER CLICKED A LINK. 😮 (Or maybe directly typed in a URL, but usually the former.)
Think of the code in app.py a set of directions for what happens when a user interacts with a page in our website. This means when we go to test each route, we have to interact with the site’s interface to kick off each coded interaction.
Routes allow us to control what the URL looks like
Notice that the ROUTE name is a little different than the HTML page (or URL) displayed at the end of this interaction. One is “about” and the other is “about.html”.
- route - https://www.make-this-now.com/about or http://127.0.0.1:5000/about locally
- function - about()
- HTML template - about.html
This means in our Flask web application the URL DOES NOT look like
https://www.make-this-now.com/about.htmlbut ratherhttps://www.make-this-now.com/aboutbecause of how the ROUTE is structured. Locally, that’shttp://127.0.0.1:5000/aboutand NOThttp://127.0.0.1:5000/about.html.
url_for()
Adding a link to a simple website looks like this:
<a href="contact.html">Contact Us</a>
Adding a link to a Flask web application looks like this:
<a href="{{url_for('contact')}}">Contact Us</a>
All links in your web application will look like the second one!
How to add a link in a web app
Here is the approach your instructors take when adding a link in a web application.
First add the link in your HTML
- STEP ONE: Add double curly brackets between the quotemarks for the href attribute
<a href="{{}}">Contact Us</a>
- STEP TWO: Add the function url_for()
<a href="{{url_for()}}">Contact Us</a>
- STEP THREE: Tell the
url_for()function which FUNCTION we want to call in app.py
<a href="{{url_for('contact')}}">Contact Us</a>
Now we are good to go. When the user clicks this link in our web app, the function indicated in the url_for() will be called in app.py.
That’s right. The 'contact' inside of the url_for() function is THE NAME OF A FUNCTION. It does NOT represent the page you want the user to go to. We first have to go to app.py and connect to a function.
Next write the route
Now go to app.py and write the route:
@app.route('/contact')
def contact():
   return render_template('contact.html')
The user may then notice that the URL at the top of the browser will change to say, for this example, “https://www.make-this-work.com/contact”.
Finish up by testing the route
And finally, the HTML page contact.html is displayed in the browser for the user to see.
Adding images and other static content
To add code and resouces used to make simple ‘static’ websites, we need to tell the web application where to look for such things as images, CSS, JS, etc… Because static resources are not processed dynamically the way our HTML will be (more on that in the next chapter), we can store them together in a folder called ‘static’.
flaskapp
└── static
    ├── css/
    ├── images/
        └── logo.png
    ├── js/
    └── favicon.ico
└── templates
└── tests
├── __init__.py
├── __main__.py
└── app.py
This is the structure for your flaskapp directory. We are going to need a way for the code controlling our application in app.py to access content in static. WE CANNOT (and should not) USE DIRECT PATHNAMES. Instead we want to allow the web application to do the work or resolving that pathname for us.
Flask provides us with a special function called ‘static’ that resolves to our static content folder without us having to write a special path. It does however need to then know the pathname for the resource WITHIN the ‘static’ folder.
For example:
<img src="{{url_for('static', filename='images/logo.png')}}" alt="logo">
Usually your static content will be sorted into folders by type of resource, so make sure you put a relative pathname into filename based off of ‘static’ as the root. (So images/logo.png is correct, and ‘logo.png’ or ‘static/images/logo.png’ are not in this example.)
This technique is how you will add CSS, JS, images and icons to your project.
Data In
What if we want to pass along some information from the web page where the user clicked to the web page where the user wants to go?
We can add a variable set to a value that shows up as part of the route, and can be accessed as a parameter in the function.
Sending data from a web page:
<a href="{{url_for('show_product', id=7)}}">Gizmo You Must Buy</a>
Notice the variable/value pair id=7. This data is sent along to the route when the link is clicked. You can add multiple variables (and values) here, just separate with a comma.
URL in the browser will change to:
http://www.some-website.com/product/7
When we get to the route in app.py we need to modify the code to grab this variable:
@app.route('/product/<id>')
def show_product(id="None"):
   return render_template('product.html')
Notice the < > in the route? That’s how we indicate that part of the pathname is variable. What the route looks like in the browser depends on how it was sent from the link. In our example, id is set to 7. The pointy brackets do not appear when the route is presented as a URL.
To use the data in our function, we set it as a parameter. It becomes a local variable we can use as needed.
The variable name in the route MUST MATCH the name of the parameter!
In general, it’s also considered best practice to set the parameter to have a default value in case something goes wrong with the data coming from where the user clicked. We chose to make the value None in this example, and encourage you to do so in general, but you technically could set that default value to 0 or giraffe, or whatever you need.
Quiz Yourself: Given each route, what is the value of product_id in @app.route(’/product/<product_id>’)?
As in what would be set to the parameter product_id in show_product()? What would print?
@app.route('/product/<product_id>')
def show_product(product_id="None"):
   print(product_id)
   return render_template('product.html')
http://127.0.0.1:5000/product/IU-keychain
IU-keychain
http://127.0.0.1:5000/product/23
23
http://127.0.0.1:5000/product/
None
Since no value was set, the default is None
http://127.0.0.1:5000/product
None
Since no value was set, the default is None
http://127.0.0.1:5000/product/X329LV7?name="IU_coffee_mug"
X329LV7
The value is still in the same place. The 'query string' starting with the `?` is another way to pass data in a URL, but will be ignored in this situation.
Data Out
What if we want to pass this id number, or other data along to the page displayed in the browser when the function completes?
Sending data from the app to a webpage
@app.route('/product/<id>')
def show_product(id="None"):
    username = 'Erika'
    return render_template('product.html', username=username, id=id)
In this example, we are passing two pieces of data along to the page product.html – an id and a username.
- The structure for passing along data is variable-name-for-use-on-html-page is assigned to variable-coming-from-data-found-in-app.
- We can pass along as many pieces of data as we want at the end of
render_template()as long as we separate them with a comma.
Naming the data being passed along
Did you notice the naming? username=username and id=id?
-
The left-side of the assignment is the name of the variable we will be able to access on the rendered HTML page.
-
The right-side of the assignment is a local variable within the function and represents the value that will be passed on to the rendered HTML page.
IT IS COMMON TO MAKE THESE THE SAME NAME. It’s not required, but often the route is just connecting the two pages together — passing the data along to the next step — there isn’t a reason to have multiple names for the same piece of data.
What happens when we get to the HTML page
When we get to the HTML page, we can see if that data was passed correctly by printing it out like this:
<!-- Place anywhere in your HTML template -->
{{id}}
{{username}}
In the next chapter we will explain the {{}} and how to have more control over how data coming in from the app is displayed in a web page.
Practice
Let’s get started on our in-class Flask web application!
Follow Along with the Instructor
Practice with the instructor. Not an exact replacement for the written directions below.
- Getting ready to work. Remembering how to start Flask.
- Creating an “about” route in our in-class Flask application.
Set-up
In VS Code, open your i211 project repository. Open the file flaskapp > app.py.
At the top of app.py add url_for to your list of modules to import:
app.py
from flask import Flask, render_template, url_for

app = Flask(__name__)
Make an About Page: Create the Route
Add a new link: “About” in the navigation
Adjust one of the generic links in the navigation so it now links to the About page.
    <header>
        <nav class="navbar navbar-expand-md navbar-dark fixed-top bg-dark">
            ...
                    <ul class="navbar-nav me-auto mb-2 mb-md-0">
                        # add this <li> code
                        <li class="nav-item">
                            <a class="nav-link" href="#">About</a>
                        </li>
- Now adjust the link’s HREF attribute by replacing the
#with the techniques used to add a link to a web application.
Add a route: /about
In app.py add a new route for an about page. The route should be /about, the function can be named whatever makes sense to you (if in doubt name it render_about()), and the rendered template should be about.html.
Add a new page: about.html
For this route to work, the HTML template must also be in place. More on what makes the HTML in a web app a so-called ‘template’ and not just a plain HTML page next chapter.
In your templates folder, create a page called about.html.
flaskapp
└── static
└── templates
    ├── about.html
    ├── base.html
    └── index.html
├── app.py
└── ...
Paste the following content into the About page:
<h1 class="display-4">About 'Make This Now!'</h1>

<p class="lead">What you need to know about 'Make This Now' recipes.</p>

<figure>
    <img src="about.jpg" class="img-fluid" alt="exhausted chef from 'The Bear' TV series">
    <figcaption>Image from <a href="#">'The Bear'</a> TV Series</figcaption>
</figure>

<p>Tired of feeling like an overworked chef in your own kitchen?</p>

<h2>Recipes Anyone Can Make</h2>

<ul>
    <li>Simple ingredients, simple directions.</li>
    <li>Healthy choices.</li>
    <li>Meals that take 20 minutes or less.</li>
</ul>

<h3>New! Add Your Own Recipes</h3>

<p>New feature! Add your own recipes and keep track of the meals you love.</p>
The page will not be the same design as the rest of our site for the moment, but you should notice that the default stylesheet in your browser kicks in, making headlines bold, and putting space around paragraphs, etc.. improving the content’s structure.
Note to students from web design: yes this in an incomplete page, we will fix that next time 😉
We’ll adjust the styling using the templating techniques that come with Flask in the next chapter.
Make an About Page: Add Static Content
If you have images, videos, CSS, JS, or any resource we have classified as ‘static’, these need to be added in a slightly different way than a link.
Add the image
Right-click to download and add this resource to your working repository:

flaskapp
└── static
    ├── images
        └── about.jpg
└── templates
├── app.py
└── ...
Q: What do we need to update to make this code for static content work in our web app?
<!-- Link doesn't work yet... -->
<figure>
    <img src="about.jpg" class="img-fluid" alt="exhausted chef from 'The Bear' TV series">
    <figcaption>Image from <a href=#>'The Bear'</a> TV Series</figcaption>
</figure>
Solution
We use url_for() to call a function in Flask to handle it.
src="{{url_for('static', filename='images/about.jpg')}}"
Update the caption
Update the link in the figcaption (replace the hashtag ‘#’) to point to the URL:
https://en.wikipedia.org/wiki/The_Bear_(TV_series).
Q: Is this link part of our web application?
No, this URL is pointing to a website that is hosted outside of our web application.
Because we don't have control over that content, nor is it part of our app, we can link to this URL directly. No `url_for()` needed!
href="https://en.wikipedia.org/wiki/The_Bear_(TV_series)"
How to run Flask and see your updates
- View the README.md in your project starter’s repository for step-by-step directions!
Made a change to an HTML page?
If you don’t see your changes, refresh the browser:
- Mac: COMMAND + R
- PC: CONTROL + R
If you STILL don’t see your changes, try a force refresh:
- Mac: COMMAND + SHIFT + R
- PC: CONTROL + SHIFT + R
Made a change to app.py?
If you started Flask from the command line, you shouldn’t have to restart Flask to see any changes after adjusting the app.py. If you started Flask from VS Code using a button, which is not our prefered way in i211 to start Flask, you may have to reload Flask to see the change.