Templating + Server-Side Rendering
In our web application, the web pages are our interface. To make a website’s design seem cohesive, some aspects of the design and content are held the same. Notice what repeats in the example.
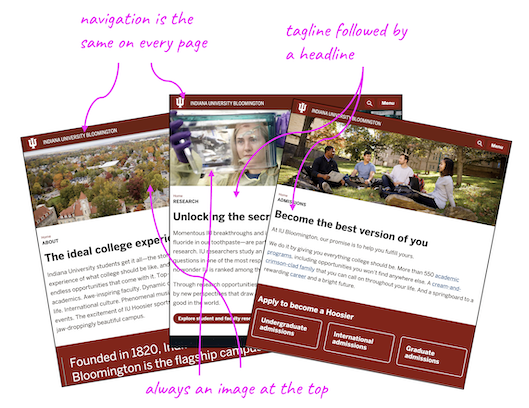
The navigation is repeated on every single page!
Each page contains an image, tagline and headline, with the same styling and in the same order! (though the content in each element is not exactly the same)
Both of these situations can be handled with much less code than in a simple website by using another feature of web applications - templating.
Templating
Remember web applications:
- make use of a database - more on that in Unit 3
- allow us to reuse parts of the code - this is called templating
- provide more control over the URL - this is called routing
In this chapter, let’s focus on templating, meaning we can reuse code for parts of our interface that repeat. (e.g. a navbar)
Templating also allows us to create dynamic websites because we can use Python/Flask to mix and match HTML and content as needed based on user requests. (e.g. the image and headline in the example)
In our web app, the HTML pages will be constructed as templates, and will live in the templates folder:
flaskapp
└── static
└── templates
    ├── about.html
    ├── base.html
    └── index.html
├── app.py
└── ...
Any HTML pages added to our application should be placed in this folder.
Jinja
Flask makes use of a templating engine designed to work with Python called Jinja.
You’ll notice under the ‘Installation’ section that we use pip to install Jinja, and indeed, we have already done this. Jinja was part of the requirements.txt we used to install the software needed for our Flask web app.
JINJA IS ALREADY INSTALLED!! 👏
Why use Jinja?
Jinja gives us a way to easily reuse code and content by creating placeholders.
You may remember we have a way to make placeholders as f-strings in Python:
story = f"It was a {adj1} and {adj2} {time-of-day}."
In Flask, the Jinja placeholders will help piece together our HTML pages (controlled by app.py) in order to avoid repeating code when possible.
Developer’s sometimes say your code needs to be DRY, which means “Don’t Repeat Yourself”. The goal for this software development principle is to reduce repetitive patterns and limit duplicate code and logic, in favor of modules and code where you can reference the pieces you need only when you need them.
Making our HTML into Jinja templates will DRY our code right out.
How to use Jinja for templating
Several Jinja placeholders (or Jinja calls them ‘delimiters’) are available – we will make the most use of two of these:
- {% … %} for Statements
- {{ … }} for Expressions to print to the template output
The first syntax {% %} is useful for creating placeholder code blocks, or when you need to make use of some basic Python-like functionality like conditional statements (if/else) or loops.
When we say in class “Jinja print”, the second syntax {{ }} is what we are talking about. It’s good for printing out variables, and also for running functions like url_for().
Using Jinja Statements for conditionals and loops
Two basic control structures are essential:
Looping over data with Jinja
<!-- Similar to Python's for loop - 'user' is the key -->
<ul>
{% for user in users %}
  <li>{{ user }} : {{ users[user] }}</li>
{% endfor %}
</ul>
Making a decision with Jinja
<!-- Similar to Python's if/else conditionals -->
{% if user == 'admin' %}
    Welcome my liege 👑!
{% elif user %}
    Access granted.
{% else %}
    Access denied.
{% endif %}
Jinja does much more than we will specifically mention in class, and possibly in ways that are more effective or direct. You’ll absolutely want to look through the documentation to see more detailed examples.
Applying Jinja
Let’s now go through the files already present in your templates folder and see how Jinja turns HTML into templates.
base.html
You may have noticed your starter Flask project comes with a base.html.
Open the base.html page and follow along with this next part.
The following HTML tags are required for a page to be considered a web page.
See if you can find these in base.html:
<!DOCTYPE html>
<html lang="en">
<head>
    <meta charset="UTF-8">
    <meta name="viewport" content="width=device-width, initial-scale=1.0">
    <title>{% block title %}{% endblock %}</title>
</head>
<body>

</body>
</html>
In the head, we will be using a Jinja Statement to create a placeholder for our website’s title. Each page may have a different title. Note: this creates a place for a title, but DOES NOT fill in the content.
The code in base.html is code we want repeated on each and every web page in our site.
base.html head
In the head, we will also place any other resources we need for the site to work.
The frontend framework Bootstrap will layout and style our site. Many website resources can be found on a Content Distributed Network (CDN) that provides a link to download the resource when included. That way we don’t have to include the code for that tool in our files. See if you can find the CDN link for Bootstrap.
We also have provided a favicon.ico, which is a little icon that appears next to the name of your site in the browser’s tab.
This is also where you can include any custom stylesheet(s) for your own CSS styles. The one we’ve included is to give users an option for light or dark mode.
base.html body
In the body, we will place any elements that APPEAR IN THE BROWSER WINDOW ON EVERY PAGE.
nav
It’s complicated looking, but we bet you can find the header with a nav nested inside without too much trouble? Find it?
OK. Now notice the unordered list nested inside nav:
<ul class="navbar-nav me-auto mb-2 mb-md-0">
    <li class="nav-item">
        <a class="nav-link" href="{{ url_for('about') }}">About</a>
    </li>
</ul>
Everytime we want to add a new link to our navigation bar, we will add a new li list item like the one we have for the About page.
main
main is where we will be adding all the content for our pages! Notice it contains container that Bootstrap needs for structuring the content, as well as a div with some spacing so our content is positioned better.
    <main class="flex-shrink-0">
        <div class="container">
            <div class="mt-5 pt-5 mb-5">
                {% block content %}{% endblock %}
            </div>
        </div>
    </main>
We are adding a placeholder for a block of content using a Jinja Statement. The content block needs both an opening {% block content %} and closing {% endblock %}. No content goes between these placeholder tags in base.html.
footer
The footer in a website is an optional area at the end of the page for information like copyrights, social media, quick links to popular content, directions, and so on. The modern usage for this space is as a kind of catch-all for everything a user might be quickly looking for but didn’t find because here they are at the bottom of the page.
JavaScript
At the very bottom, just before the </body> close body tag, you may also see one more more <script> tags. This is for any JavaScript we want to include on the page. You may also see script tags in the head sometimes too.
index.html
The index page is the home page for a website. It is also our FIRST OPPORTUNITY to fill in the placeholders created in base.html.
In the base template, we made two placeholders — one for a title, and one for a block of content. By EXTENDING this template, we can now create pages that will use all the HTML found in base.html, and then we only need to worry about adding the content specific to the page.
{% extends "base.html" %}

{% block title %}Home{% endblock %}

{% block content %}
    <h1 class="display-4">Headline</h1>
    <p class="lead mb-5">Opening paragraph.</p>
    <!-- more content -->
{% endblock %}
EVERY PAGE YOU MAKE FOR YOUR WEB APP WILL HAVE THESE THREE JINJA STATEMENTS.
- The first extends the base - meaning all the code from the base.html will be loaded first
- The second provides content for the title that appears in the browser tab
- And the third is for any content appearing on that specific page
In general, for the projects we will be building, you’ll want an h1 tag because that is the title appearing at the top of each webpage.
Revisiting about.html
Let’s revisit the route we created for a user wanting to see the About page.
1. The user first clicks on a link in the navigation bar. Because the navigation is found on every page of our web app, the code for the navbar lives in base.html.
<!-- base.html - in the navbar -->
<ul class="navbar-nav me-auto mb-2 mb-md-0">
    <li class="nav-item">
        <a class="nav-link" href="{{ url_for('render_about') }}">About</a>
    </li>
</ul>
The url_for() is wrapped in a Jinja Expression. Flask knows to look in app.py for the about function.
2. Next we go to app.py to run the function about().
# app.py
@app.route('/about')
def render_about():
   return render_template('about.html')
The render_template() function is required here to process the Jinja now present in our HTML templates. This function visits the templates directory in our web app, finds the template mentioned, in this case about.html, and sends it on to the browser for display.
flaskapp
└── static
└── templates
    ├── about.html
    ├── base.html
    └── index.html
├── app.py
└── ...
3. The about.html page is found in the templates directory and displayed in the browser
Practice
Let’s start by updating our About page to make use of Jinja templating. This will improve the look and feel of the content, and allow us to see the power of Jinja. ⚡️
Follow Along with the Instructor
Practice with the instructor. Not an exact replacement for the written directions. You’ll want to work through with me, but also make sure to read the rest or even try again on your own just following the directions.
- Revising the About route, but this time with Bootstrap and templating. Adding CSV data to our web app.
- Updating the Index route (home page) to make use of the data in the CSV and Bootstrap.
Update the About Page to Use Jinja Templating
Add the following code to your about.html page. Replace the ... seen in the title block and content block with the title ‘About’ and the content we already have. Remember the Jinja Statement must wrap around the content. It has a start and end tag just like HTML does.
{% extends "base.html" %}

{% block title %}...{% endblock %}

{% block content %}
...
{% endblock %}
When you’re done, the About page should now display a navigation bar and footer, and updated typography styles.
Update the Home Page (index.html)
Open up index.html and replace the code with the following:
{% extends "base.html" %}
{% block title %}Make This Now{% endblock %}
{% block content %}
<h1 class="display-4">🍳 Make This Now!</h1>
<p class="lead">Simple, delicious recipes to keep you happy
and your belly full.</p>
{% endblock %}
We also need to update the link to the home page in the navigation. Open up base.html and replace the navbar branding line in <header> with this version:
<a class="navbar-brand" href="#">Make This Site Now! 🍳</a>
The link # is just a placeholder. Replace it with the Jinja method for creating a link in a Flask web app.
Solution
href="{{url_for('render_index')}}"
Display Available Recipes on the Home Page
Next, we want to display all available recipes on our home page. We will need to make use of Jinja, routing, Bootstrap, and knowledge of how to read in and unpack a CSV file using Python.
Access a CSV with Recipe Data
1. Add recipes.csv to your project’s root directory. This is OUTSIDE of the flaskapp directory.
root
└── vscode
└── flaskapp
├── venv
├── recipes.csv
└── ...
2. Open app.py, import the csv module, and add the function get_all_recipes():
# Add after 'from Flask...'
import csv
# Add after 'app = Flask(__name__)'

def get_all_recipes():
    with open('recipes.csv', encoding='UTF-8-sig') as csvfile:
        contents = csv.DictReader(csvfile)
        all_recipes = {row['recipe_slug']: {
            'recipe_slug': row['recipe_slug'],
            'recipe_name': row['recipe_name'],
            'description': row['description'],
            'recipe_image': row['recipe_image'],
            'rating': row['rating'],
            'url': row['url']
        } for row in contents}
    return all_recipes

# all routes are below this code
This function reads in the CSV file recipes.csv, and loads the content as a nested dictionary. That means all_recipes will be a dictionary of dictionaries.
# {slug : {dictionary}, slug: {dictionary}, ...}
{
    'Microwave-Mac-and-Cheese': {
        'recipe_slug': 'Microwave-Mac-and-Cheese',
        'recipe_name': 'Microwave Mac and Cheese',
        'description': "This from-scratch mac and cheese cooks in one bowl, and you don't have to boil the macaroni or cook the cheese sauce separately. Plus, it's ready in less than half an hour. A blend of American and Jack cheeses makes the sauce smooth and tangy.",
        'recipe_image': 'images/recipe-images/mac-and-cheese.jpg',
        'rating': '4',
        'url': 'https://www.foodnetwork.com/recipes/food-network-kitchen/microwave-mac-and-cheese-3363099'
    },
    '5-Ingredient-Chicken-Pesto-Soup': {...},
    ...
}
Note: A “slug” is a nickname, and usually written without spaces so it can be used as a key like we do here.
Display the Data on the Home Page
Review Routes: Data Out before attempting this next part.
1. Rewrite the root route (“/”) to get all of the recipe data from a CSV and store it in a local variable. Call this variable ‘all_recipes’.
# app.py
@app.route("/")
def index():
    # add code here
    return render_template("index.html")
2. Now take that variable (set to our nested dictionary of recipes), and pass it out of the route and on to the index.html template page.
Solution: Try it First
    @app.route("/")
    def index():
        all_recipes = get_all_recipes()
        return render_template("index.html", all_recipes=all_recipes)
3. Test that the data made it to the home page. Use a Jinja Expression to display the variable all_recipes on index.html.
{% extends "base.html" %}
{% block title %}Make This Now{% endblock %}
{% block content %}
<h1 class="display-4">🍳 Make This Now!</h1>
<p class="lead">Simple, delicious recipes to keep you happy and your belly full.</p>
# Add your code here
{% endblock %}
Solution: Try it First
    {% block content %}
    ...
    {{ all_recipes }}
    {% endblock %}
Never skip this step when setting up a new route. Always make sure the data is present and you understand how it is constructed before attempting to mark it up with HTML.
4. Use Jinja to unpack the data.
The data we’ve brought in is a complex data structure. It’s not just one value, it’s a lot of values. Anything in a list, dictionary, or nested list or dictionary may need to be unpacked so we can see the parts. To do that we need a loop.
Here is the most basic way to write this:
{% for recipe in all_recipes %}
    <p>Key: {{recipe}}</p>
    <p>Value: {{all_recipes[recipe]}}</p>
{% endfor %}
Notice that ‘recipe’ is the KEY not the VALUE.
Jinja provides several methods for unpacking data using a for loop, but the most straightforward way is perhaps just to use the indexing techniques we already know. Indexing will allow us to access the value for each item in the dictionary just fine.
On this page, we do not need every single aspect of every single recipe. We just need the name and the image. This should show us the data we will need for items on this page:
{% for recipe in all_recipes %}
    <p>{{all_recipes[recipe]['recipe_name']}}<br>
    {{all_recipes[recipe]['recipe_image']}}</p>
{% endfor %}
Once the data is printing out for each recipe, it’s time to figure out how to improve the design and layout.
5. Use Bootstrap to format each recipe as a card.
We will be using Bootstrap to provide much of the HTML, all of the CSS, and when needed, the JS, in order to focus on what Flask is doing, but still end up with a professional-looking website.
Open the link and look at the first example. This is where the code was copied from, minus a descriptive paragraph and a button, which we don’t need this time.
- Before you get too far with this, go ahead and add this folder of recipe images to your ‘static’ folder under the ‘images’ directory. You’ll need to unzip this resource to use.
On a Mac, and can’t figure out how to find where this project lives on your computer? With the file structure visible (Explorer) in VS Code, right click and “Reveal in Finder”.
Copy in each step below one at a time. Examine the result before moving on to the next step.
First we need the code for a card:
We updated the recipe title to be a H2 in order for the hierarchy to make sense — otherwise the code is the same was what Bootstrap provided.
- H1 “Make This Now!” site title
- H2 Recipe titles
<div class="card" style="width: 18rem;">
  <img src="..." class="card-img-top" alt="...">
  <div class="card-body">
    <h2 class="card-title">Card title</h2>
  </div>
</div>
Second, we need to replace the ... and filler text with our content.
Notice that the image is STATIC CONTENT and must be put in accordingly.
{% for recipe in all_recipes %}

    <div class="card" style="width: 18rem;">
    <img class="card-img-top" src="{{url_for('static', filename=all_recipes[recipe]['recipe_image'])}}"
                alt="{{all_recipes[recipe]['recipe_name']}}">
    <div class="card-body">
        <h2 class="card-title">{{all_recipes[recipe]['recipe_name']}}</h2>
    </div>
    </div>

{% endfor %}
Third, use Boostrap’s “Grid” to layout the content in rows and columns on the page.
<div class="row">
    {% for recipe in all_recipes %}
    <div class="col-12 col-md-6 col-lg-4 col-xl-3 mb-5">

        <div class="card" style="width: 18rem;">
            <img class="card-img-top" src="{{url_for('static', filename=all_recipes[recipe]['recipe_image'])}}"
                alt="{{all_recipes[recipe]['recipe_name']}}">
            <div class="card-body">
                <h2>{{all_recipes[recipe]['recipe_name']}}</h2>
            </div>
        </div>

    </div>
    {% endfor %}
</div>
And fourth, also included in the code from step three, the hvr-grow class class to create a rollover effect for each element, and the h-100 class to make the cards all the same height.
<div class="card h-100 hvr-grow" style="width: 18rem;">